动态 QR 支付
- DuitNow
- 支付宝+
DuitNow QR 支付流程
以下是使用自动售货机作为案例研究的动态 QR 码的样本支付流程。
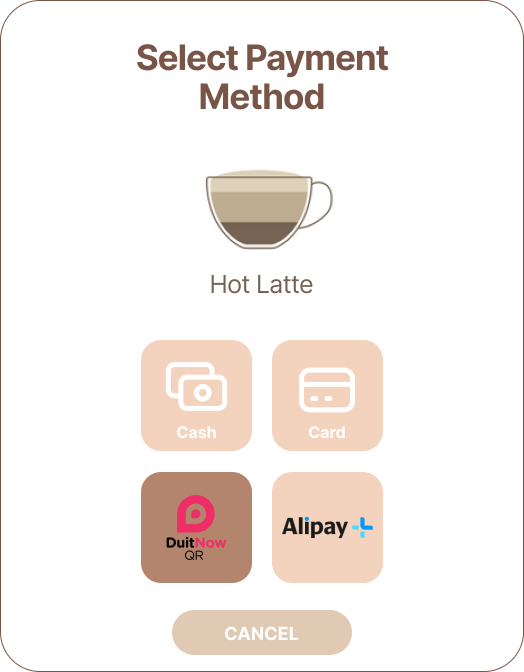
步骤 1:选择支付方式
消费者在购买商品后选择 DuitNow QR 作为支付方式。
下面的图片显示了一个样本自动售货机结账页面。
步骤 2:生成并显示动态 QR 码
自动售货机利用 QR 负载生成 API 生成动态 QR 码并将其显示出来。
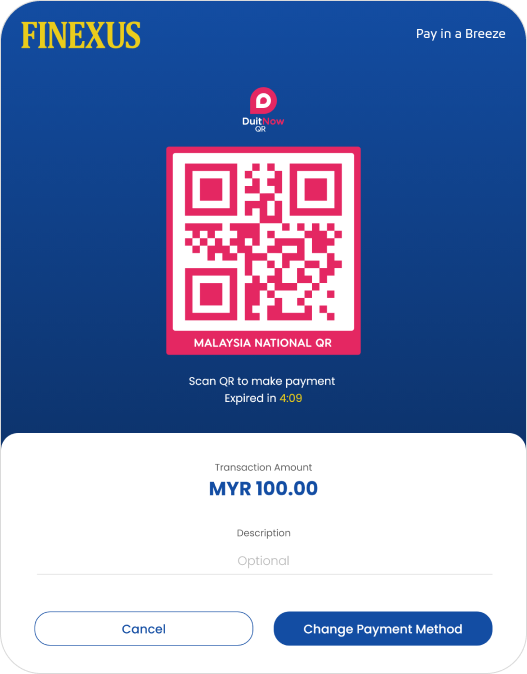
步骤 3:顾客扫描 QR 码
随后,顾客扫描 QR 码以启动支付流程。与此同时,自动售货机期望在30秒内收到支付通知。
步骤 4:支付通知
- 如果在30秒的规定时间内,自动售货机未收到指定回调URL中的支付通知,将触发 QR 码支付查询 API 来检查支付状态。
- 如果未收到 QR 码支付响应,自动售货机将在每5秒进行一次查询,持续最多5分钟,等待成功或拒绝的状态。
- 如果经过3分钟的时间,仍未收到具体的状态更新(已批准或失败),自动售货机将中止购买尝试。
提示
QR 交易的推荐超时时间是在已流逝时间前约10秒,即在5分钟之前的10秒。
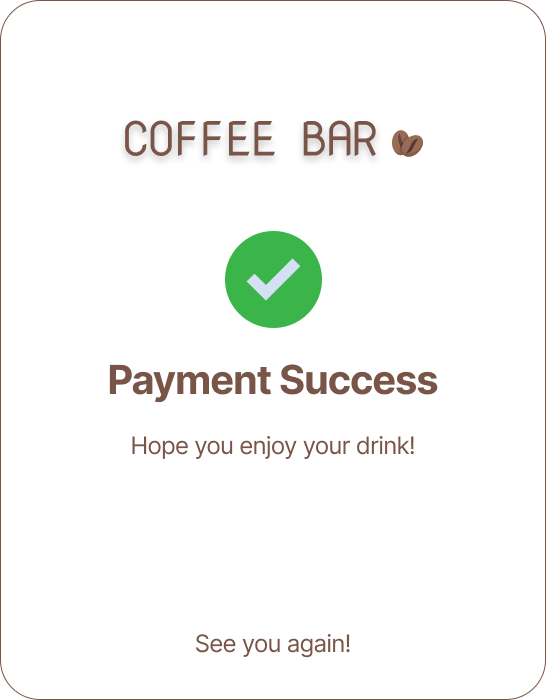
步骤 4.0:支付成功
下面的图片显示了自动售货机在成功处理支付时的样本通知屏幕。
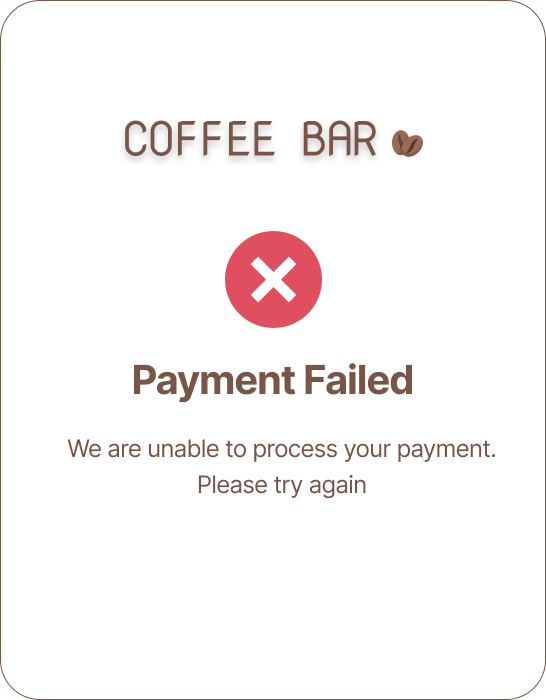
步骤 4.1:支付失败
下面的图片显示了自动售货机在支付失败时的样本通知屏幕。
示例代码
以下示例代码可用于将 QR 负载数据转换为数字 QR 图像,使用户能够轻松地扫描和处理其中编码的信息。
步骤 1:QR 码占位符
占位符的设计遵循DuitNow指南.
CSS
html, body {
    height: 100%;
    margin: 0;
    flex-direction: column;
}

@font-face {
  font-family: "gotham";
  src: url("../fonts/GothamRoundedBold.ttf") format("truetype");
}

.gotham-font {
    font-family: "gotham";
}

.content {
  width: 300px; /* set the width of the content */
  height: 200px; /* set the height of the content */
  position: absolute;
  top: 25%;
  left: 50%;
  transform: translate(-50%, -25%);
}

.duitnow-border {
    border:10px solid;
    background-color: rgb(237, 46, 103);
    border-bottom-width: 1px;
    border-color: rgb(237, 46, 103);
    border-top-left-radius: 8px;
    border-top-right-radius: 8px;
    max-width:240px;
}

.duitnow-bg {
    border-radius: 8px;
    background-color: white;
    padding: 15px;
}

.duitnow-border-txt {
    background-color: rgb(237, 46, 103);
    max-width: 260px;
    padding-top: 12px;
    padding-bottom: 12px;
    border-bottom-left-radius: 8px;
    border-bottom-right-radius: 8px;
}

.duitnow-txt {
    background-color: rgb(237, 46, 103);
    width: 250px;
    margin: 0;
    color: white;
    font-size: 15px;
}
Html/jsp
<body class="content">
    <div align="center">
        <div class="duitnow-border" align="center">
            <div class="duitnow-bg" align="center">
                <img id="qrCode" height="210" width="210">
            </div>
        </div>
        <div class="duitnow-border-txt">
            <p class="gotham-font duitnow-txt">MALAYSIA NATIONAL QR</p>
        </div>
    </div>
    <form action="demoservlet" method="get">
        <div align="center" style="margin-top: 20px">
            <input type="submit" value="send">
        </div>
    </form>
</body>
步骤 2:从返回的链接中提取 QR 负载
返回的链接包含 QR 负载。提取负载并放入占位符中。
javascript
<script>
    var urlParams = new URLSearchParams(window.location.search);
    var myParam = urlParams.get('f370_QRPayload');

    if (myParam === null || myParam === undefined) {
        console.log("Parameter is not set");
    } else {
        $.get("qrservlet?myParam=" + myParam, function(base64Image) {
            $("#qrCode").attr("src", "data:img/png;base64," + base64Image);
        });
    }
</script>
Servlet (java) – doGet method
String qrCodeData = request.getParameter("myParam");

    QRCodeWriter writer = new QRCodeWriter();
    try {

        Map<EncodeHintType, Object> hints = new EnumMap<EncodeHintType, Object>(EncodeHintType.class);
        hints.put(EncodeHintType.ERROR_CORRECTION, ErrorCorrectionLevel.H);
        hints.put(EncodeHintType.MARGIN, 1);

        BitMatrix bitMatrix = writer.encode(qrCodeData, BarcodeFormat.QR_CODE, 450, 450, hints);

        // Define the color you want to use using RGB values
        int customColor = 0xFFED2E67; // Pink color

        // Create a new MatrixToImageConfig object with the desired foreground and background colors
        MatrixToImageConfig config = new MatrixToImageConfig(customColor, 0xFFFFFFFF);

        // Write the image data to the response output stream using the modified configuration
        ByteArrayOutputStream outputStream = new ByteArrayOutputStream();
        MatrixToImageWriter.writeToStream(bitMatrix, "png", outputStream, config);
        byte[] imageBytes = outputStream.toByteArray();
        String base64Image = Base64.getEncoder().encodeToString(imageBytes);
        response.setContentType("text/plain");
        response.setCharacterEncoding("UTF-8");
        response.getWriter().write(base64Image);
    } catch (WriterException e) {
        e.printStackTrace();
    }
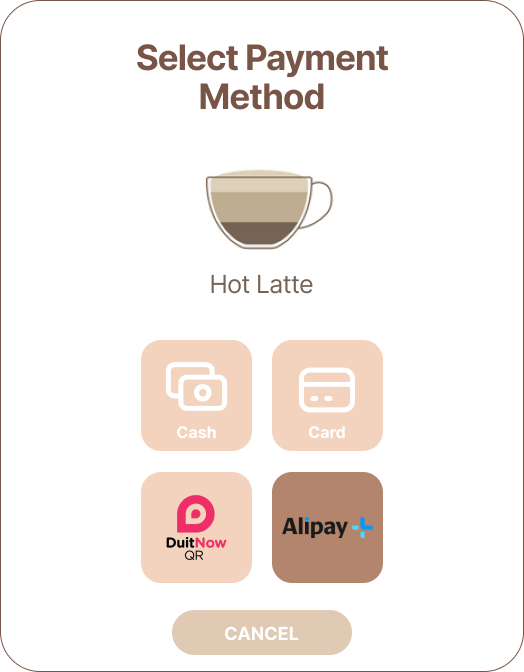
支付宝+ QR 支付流程
以下是使用自动售货机作为案例研究的动态 QR 码的样本支付流程。
步骤 1:选择支付方式
消费者在购买商品后选择支付宝+作为支付方式。
下面的图片显示了一个样本自动售货机结账页面。
步骤 2:生成并显示动态 QR 码
自动售货机利用 QR 负载生成 API 生成动态 QR 码并将其显示出来。
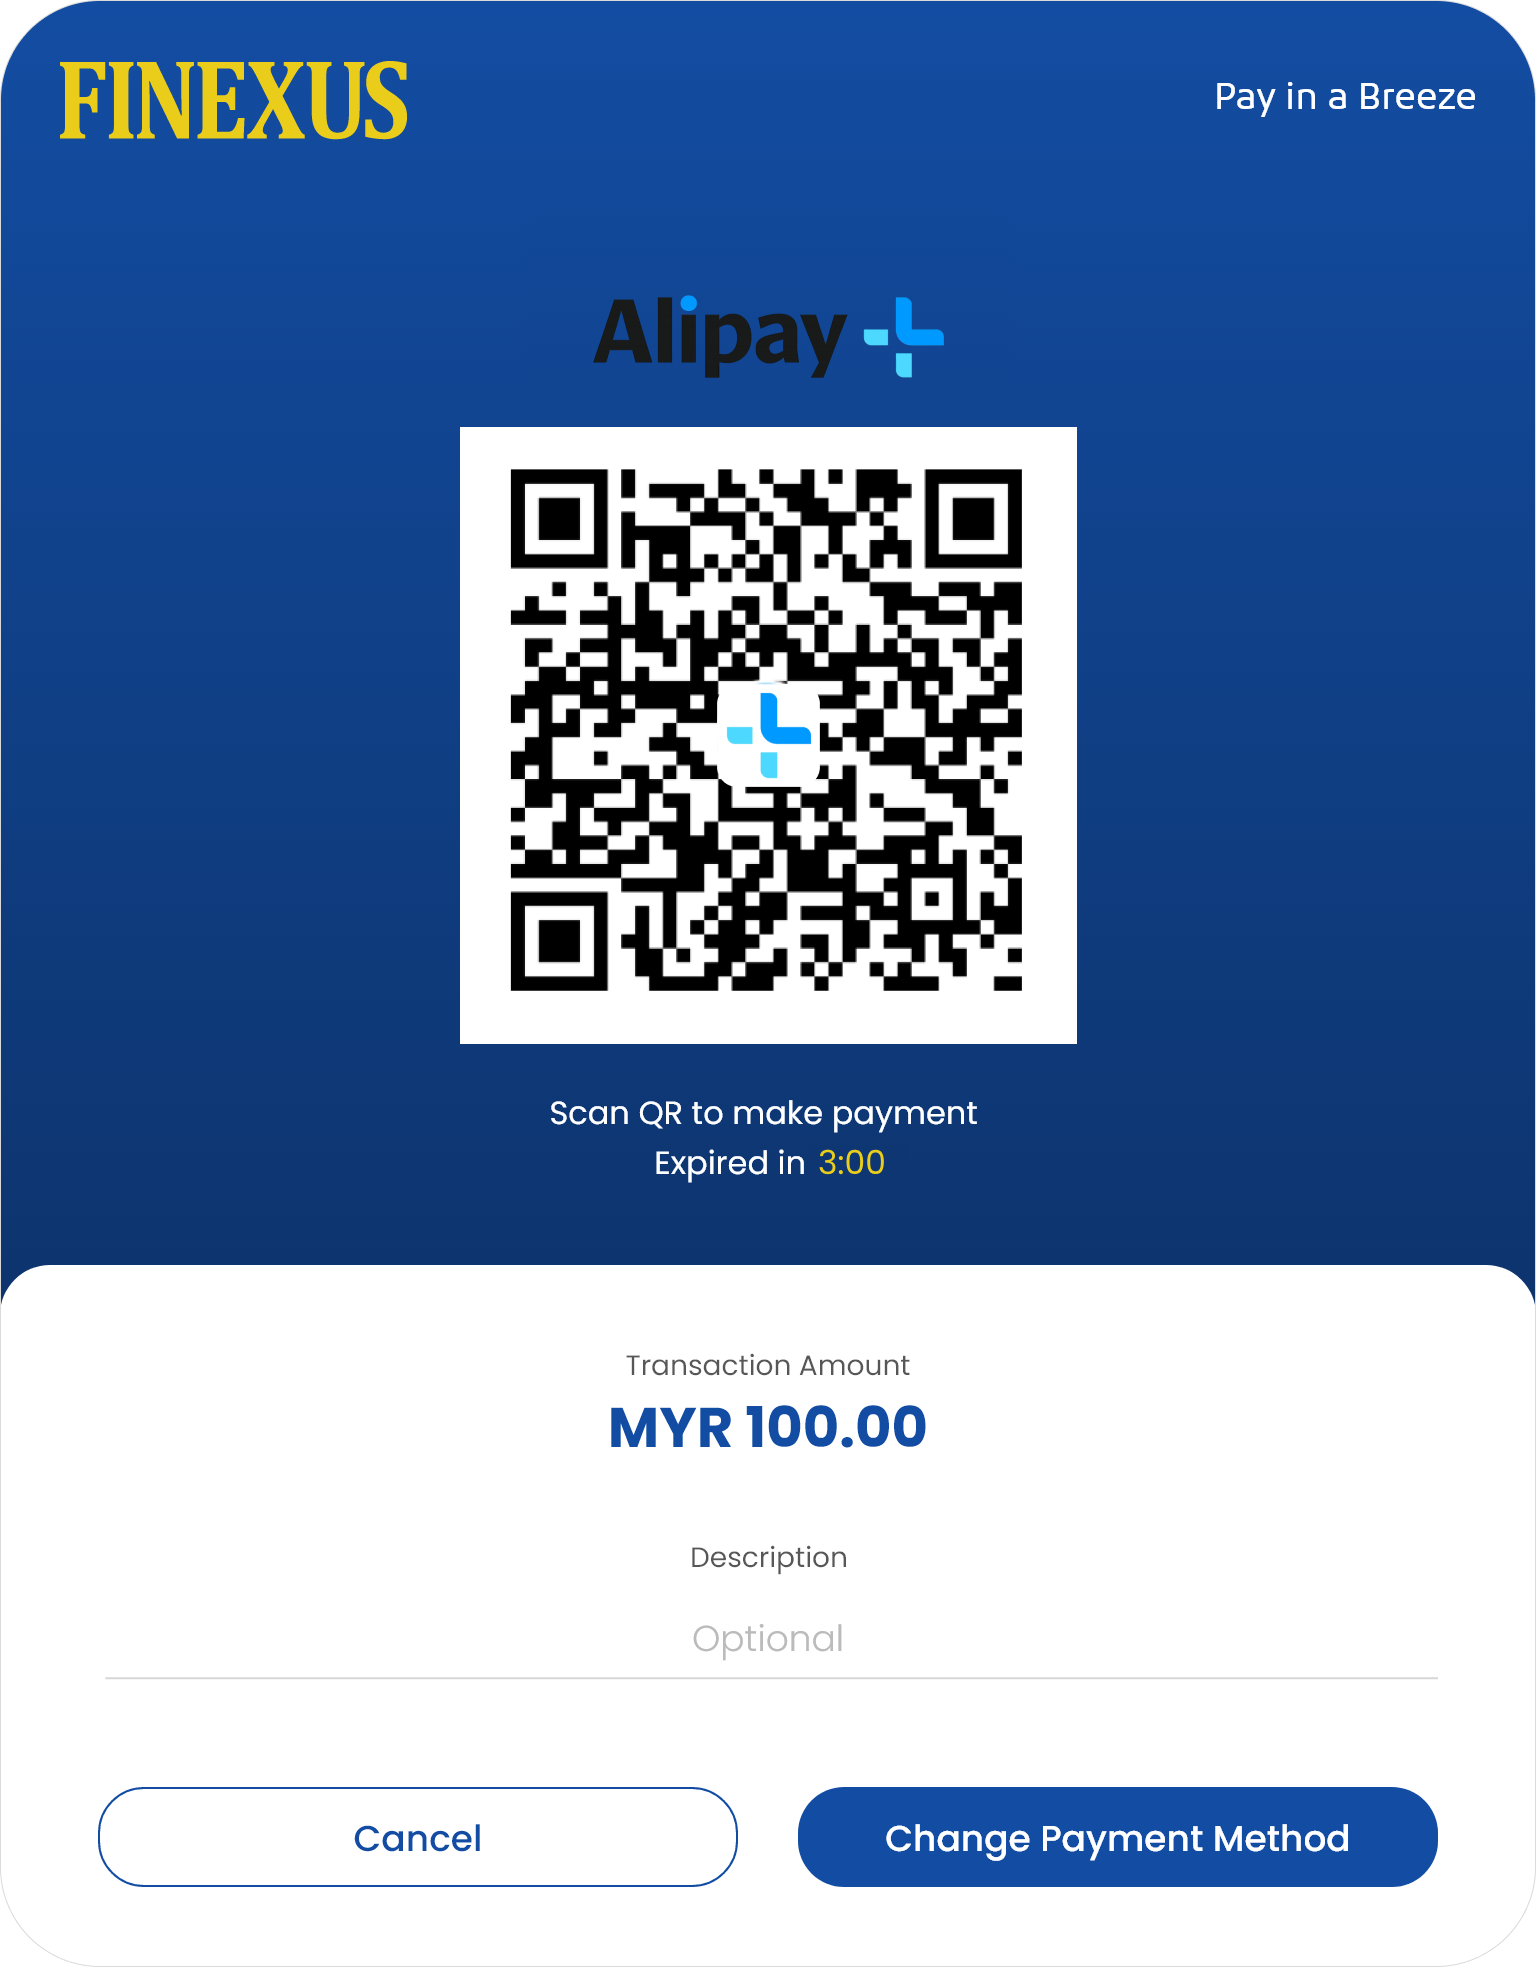
步骤 3:消费者扫描 QR 码
随后,消费者扫描 QR 码以启动支付流程。与此同时,自动售货机期望在30秒内收到支付通知。
步骤 4:支付通知
- 如果在30秒的规定时间内,自动售货机未收到指定回调URL中的支付通知,将触发 QR 支付查询 API 来检查支付状态。
- 如果未收到 QR 支付响应,自动售货机将在每5秒进行一次查询,持续最多3分钟,等待成功或拒绝的状态。
- 如果经过3分钟的时间,仍未收到具体的状态更新(已批准或失败),自动售货机将中止购买尝试。
步骤 4.0:支付成功
下面的图片显示了自动售货机在成功处理支付时的样本通知屏幕。
步骤 4.1:支付失败
下面的图片显示了自动售货机在支付失败时的样本通知屏幕。
示例代码
步骤 1:从返回的链接中提取 QR 负载
返回的链接包含 QR 负载。提取负载并在浏览器中输入。
javascript
<script>
    var urlParams = new URLSearchParams(window.location.search);
    var myParam = urlParams.get('f370_QRPayload');

    if (myParam === null || myParam === undefined) {
        console.log("Parameter is not set");
    } else {
        $.get("qrservlet?myParam=" + myParam, function(base64Image) {
            $("#qrCode").attr("src", "data:img/png;base64," + base64Image);
        });
    }
</script>
Servlet (java) – doGet method
String qrCodeData = request.getParameter("myParam");

    QRCodeWriter writer = new QRCodeWriter();
    try {

        Map<EncodeHintType, Object> hints = new EnumMap<EncodeHintType, Object>(EncodeHintType.class);
        hints.put(EncodeHintType.ERROR_CORRECTION, ErrorCorrectionLevel.H);
        hints.put(EncodeHintType.MARGIN, 1);

        BitMatrix bitMatrix = writer.encode(qrCodeData, BarcodeFormat.QR_CODE, 450, 450, hints);

        // Define the color you want to use using RGB values
        int customColor = 0xFF000000; // Pink black

        // Create a new MatrixToImageConfig object with the desired foreground and background colors
        MatrixToImageConfig config = new MatrixToImageConfig(customColor, 0xFFFFFFFF);

        BufferedImage qrImage = MatrixToImageWriter.toBufferedImage(bitMatrix, config);
        // Getting logo image
        BufferedImage logoImage = ImageIO.read( new File("E:\\alipay.png"));
        int finalImageHeight = qrImage.getHeight() - logoImage.getHeight();
        int finalImageWidth = qrImage.getWidth() - logoImage.getWidth();

        //Merging both images
        BufferedImage finalImage = new BufferedImage(qrImage.getHeight(), qrImage.getWidth(), BufferedImage.TYPE_INT_ARGB);
        Graphics2D graphics = (Graphics2D) finalImage.getGraphics();
        graphics.drawImage(qrImage, 0, 0, null);
        graphics.setComposite(AlphaComposite.getInstance(AlphaComposite.SRC_OVER, 1f));
        graphics.drawImage(logoImage, (int) Math.round(finalImageWidth / 2), (int) Math.round(finalImageHeight / 2), null);

        // Write the image data to the response output stream using the modified configuration
        ByteArrayOutputStream outputStream = new ByteArrayOutputStream();
        ImageIO.write(finalImage, "png", outputStream);
        byte[] imageBytes = outputStream.toByteArray();
        String base64Image = Base64.getEncoder().encodeToString(imageBytes);
        response.setContentType("text/plain");
        response.setCharacterEncoding("UTF-8");
        response.getWriter().write(base64Image);

    } catch (WriterException e) {
        e.printStackTrace();
    }