Kayaaku POS via HTTP
Kayaaku POS via HTTP (web-based) is only available on the EDC device.
Advanced Connectivity: The Versatility of HTTP-Enabled POS Systems
As businesses increasingly move toward digital-first solutions, HTTP-enabled POS systems provide a modern approach to payment processing, leveraging internet connectivity to deliver real-time, flexible transactions. Using the HTTP protocol, these systems connect directly to online servers, enabling seamless communication between the POS terminal and backend systems for processing payments, managing inventory, and generating reports.
Ideal for businesses with multiple locations or those requiring remote management, HTTP-enabled POS systems offer scalability, making it easy to access and manage data from anywhere. By utilizing a web-based connection, businesses can ensure fast, reliable transactions while staying adaptable to future technological advancements.
With HTTP-enabled POS systems, businesses gain the flexibility and efficiency needed to deliver a streamlined, cloud-connected checkout experience that keeps pace with the evolving demands of modern commerce.
Visual Overview
The following visual overview illustrates the entire Kayaaku POS via HTTP process, showcasing the sequence of interactions.
- EDC (Electronic Data Capture)
A standalone Bluetooth terminal designed for secure and efficient payment processing, ideal for traditional retail environments, supporting multiple payment options with easy setup.
- Card Payment
- QR Payment

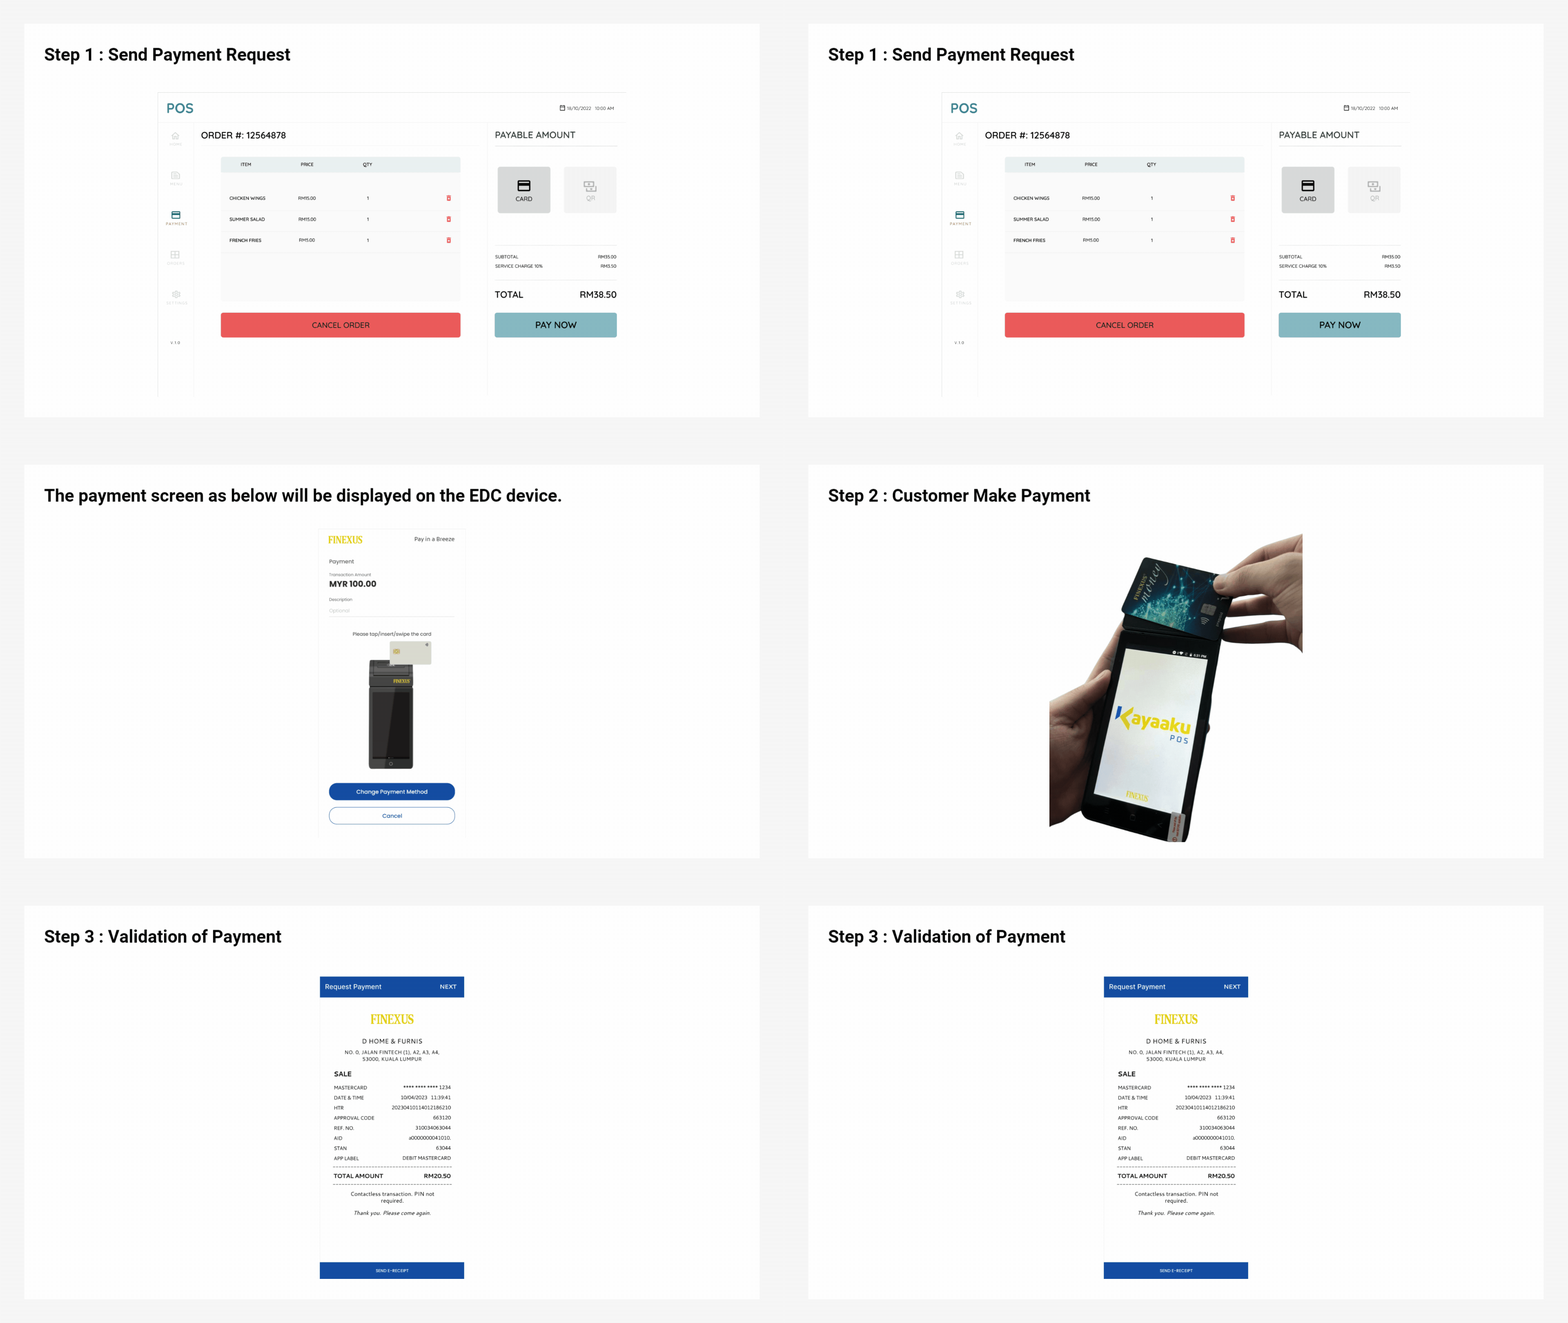
Expand for Detailed EDC Card Payment Process
Step 1 : Send Payment Request
Send a payment request from merchant's POS website. Choose card payment mode and click "PAY NOW".
The payment screen will be displayed on the EDC device.
Step 2 : Customer Make Payment
Customer can tap their card on the EDC device to make payment.
Step 3 : Validation of Payment
Once the transaction is successful, a receipt will be displayed on the EDC device.
Merchant has to click on the NEXT button for the payment response to be sent back to the Kayaaku POS app.

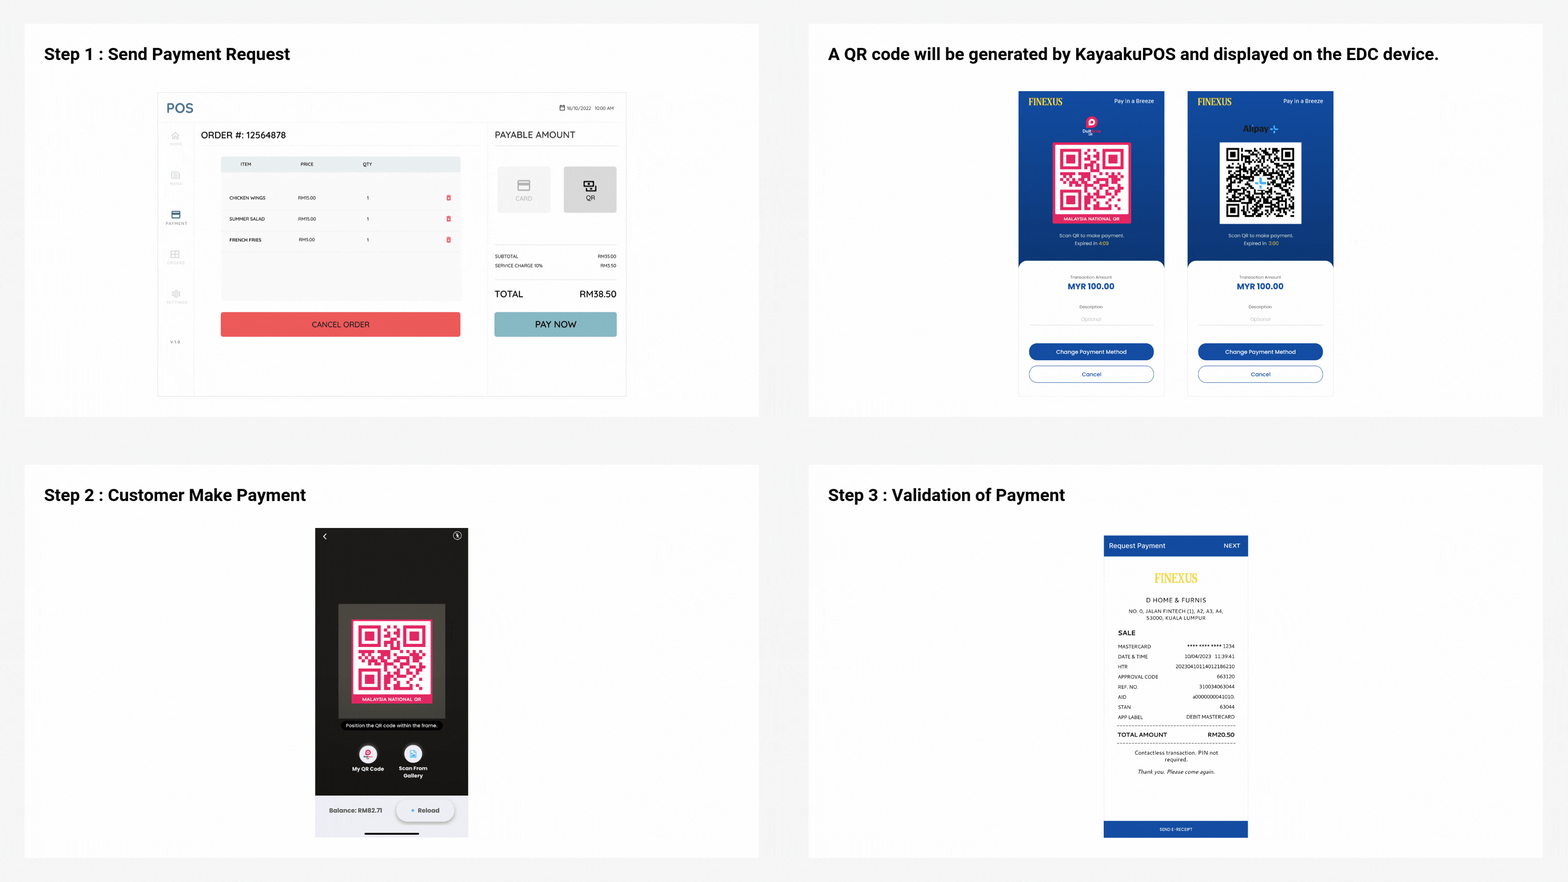
Expand for Detailed EDC QR Payment Process
Step 1 : Send Payment Request
Send a payment request from merchant's POS website. Choose QR payment mode and click "PAY NOW".
A QR code will be generated by KayaakuPOS and displayed on the EDC device.
Step 2 : Customer Make Payment
Customer scans the QR code displayed and proceeds with payment.
Step 3 : Validation of Payment
Once the transaction is successful, a receipt will be displayed on the EDC device.
Merchant has to click on the NEXT button for the payment response to be sent back to the Kayaaku POS app.
Kayaaku POS via HTTP
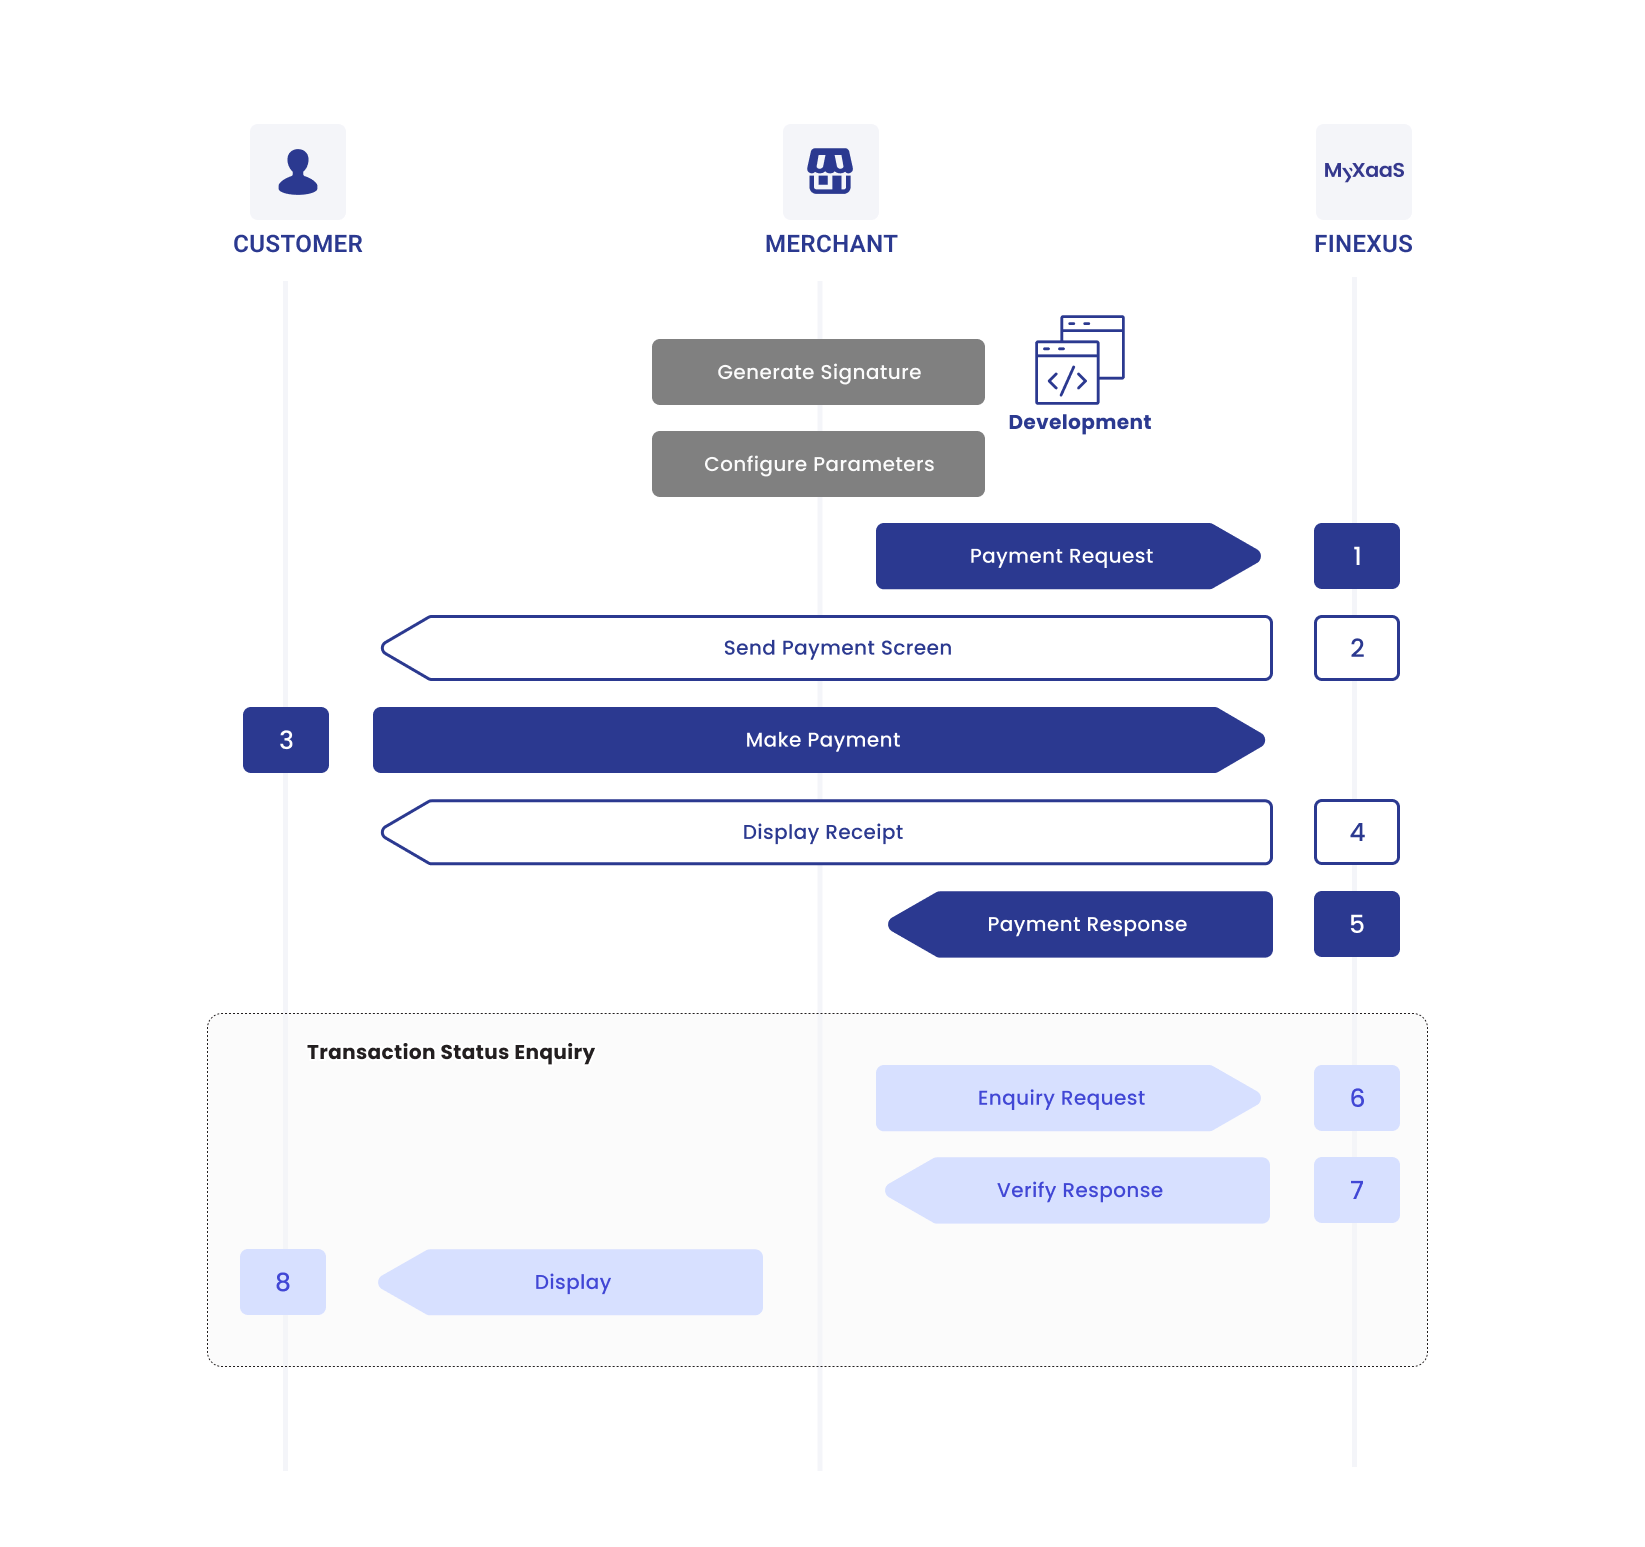
Process Flow Diagram
The diagram below provides a more detailed visual of the Kayaaku POS via HTTP process, mapping out each step:
Process Flow Table
The table below breaks down the Kayaaku POS via HTTP process into detailed steps, showing the specific interactions between the Customer, Merchant and MyXaaS:
| Step | Sender | Receiver | Process |
|---|---|---|---|
| 1 | Merchant | MyXaaS | Merchant sends payment request to MyXaaS. |
| 2 | MyXaaS | Customer | MyXaaS presents payment screen. |
| 3 | Customer | MyXaaS | Customer makes payment. |
| 4 | MyXaaS | Customer | If the payment is processed successfully, MyXaaS displays payment receipt. |
| 5 | MyXaaS | Merchant | Merchant sends payment response to MyXaaS. |
| 6 | Merchant | MyXaaS | If the payment status is not received, Merchant proceeds to send transaction status enquiry to retrieve the transaction information. |
| 7 | MyXaaS | Merchant | MyXaaS returns the status information of the payment. |
| 8 | Merchant | Customer | Merchant displays the status information to the customer. |
