Kayaaku POS via USB
Kayaaku POS via USB serial cable is only available for the mPOS device.
Reliable and Efficient: The Power of USB-Enabled POS Systems
In the ever-evolving landscape of retail and service industries, having a dependable and easy-to-use point-of-sale (POS) system is crucial. USB-enabled POS systems offer a reliable, plug-and-play solution that ensures seamless payment processing with minimal setup.
These systems connect directly to a computer or terminal via USB, providing a stable and secure link for processing transactions. USB-enabled POS systems are known for their consistent performance, making them ideal for high-traffic environments such as retail stores, restaurants, and kiosks where reliability is key.
By offering a straightforward connection and compatibility with a wide range of devices, USB-enabled POS systems help businesses streamline operations, reduce downtime, and ensure a fast, efficient checkout experience for customers.
Visual Overview
The following visual overview illustrates the entire Kayaaku POS via USB process, showcasing the sequence of interactions.
- mPOS (Mini Point of Sale)
A compact Bluetooth device that turns smartphones or tablets into POS systems, offering flexible payment processing anywhere with support for various payment methods.
- Card Payment
- QR Payment

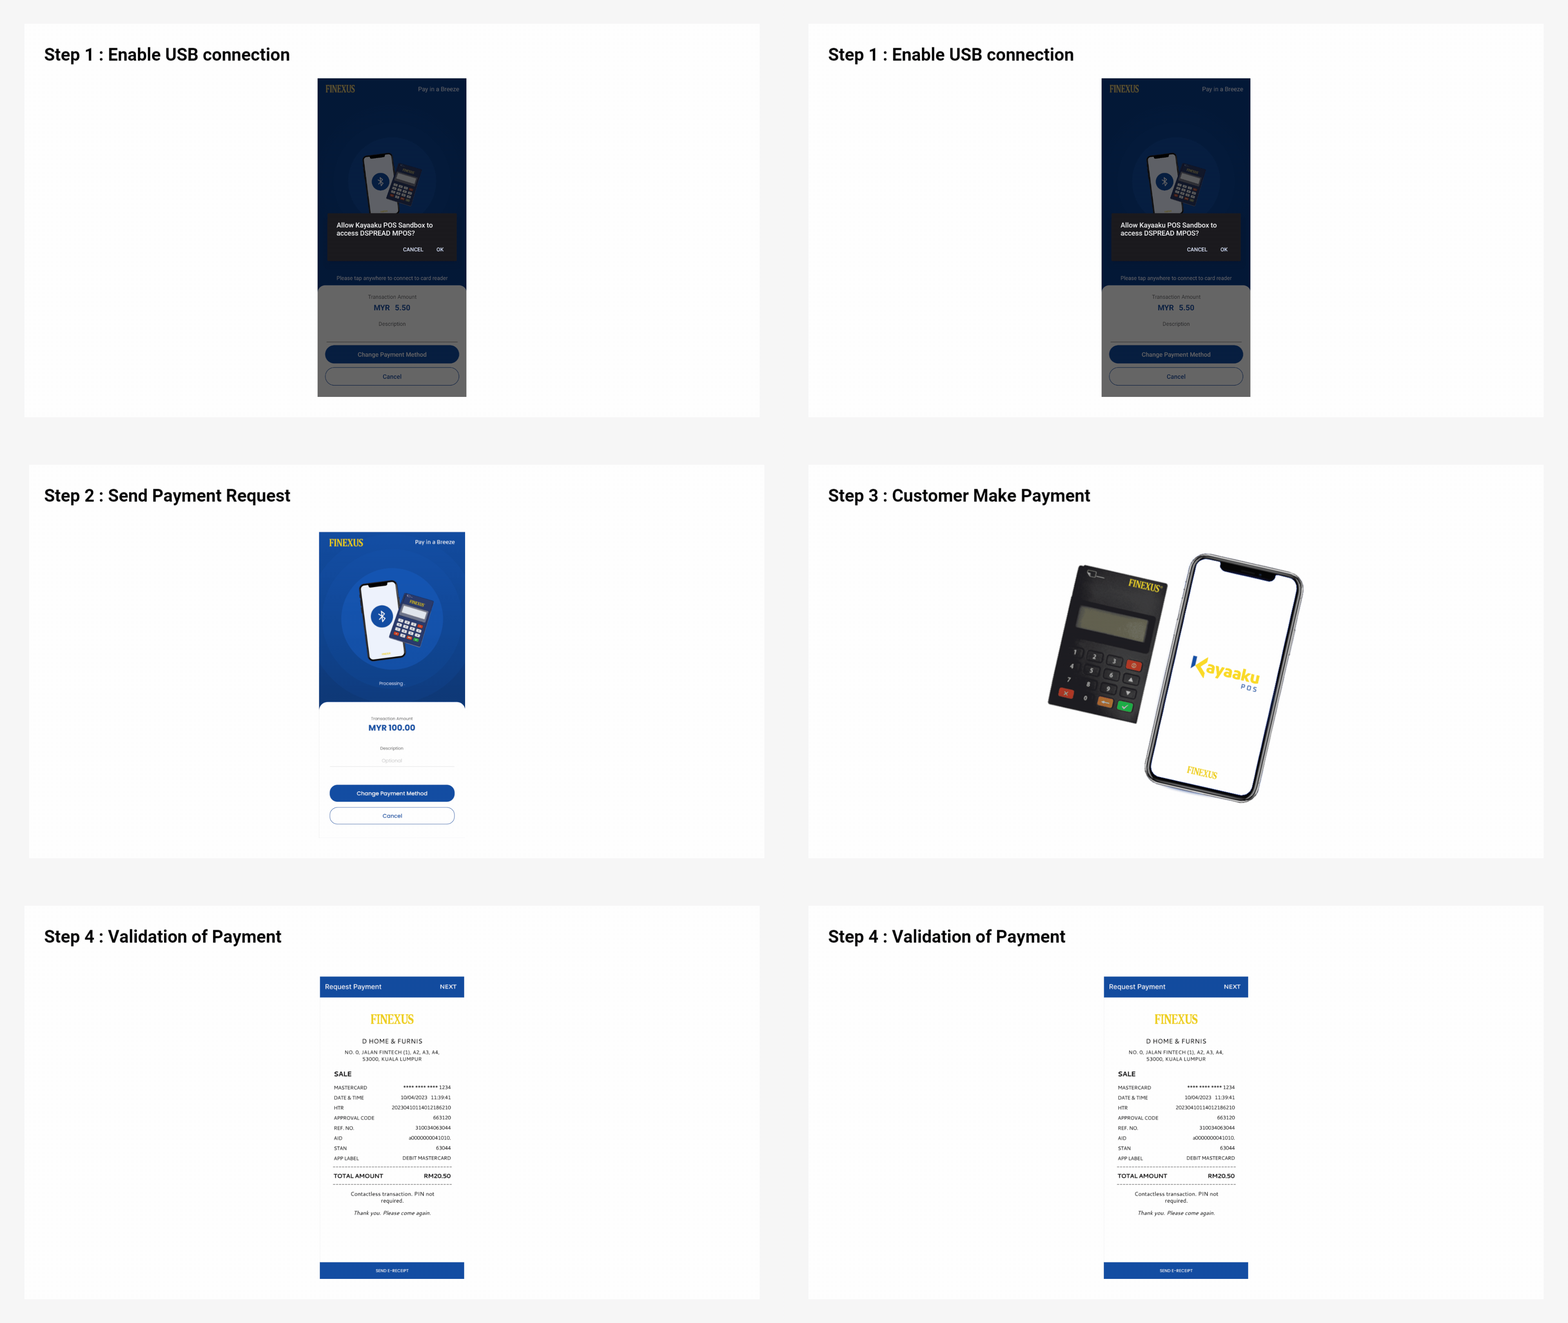
Expand for Detailed mPOS Card Payment Process
Step 1 : Enable USB connection
Enable USB connection on merchant's Android device to connect to the mPOS device.
Step 2 : Send Payment Request
Send a payment request from merchant's POS application to the Kayaaku POS. The integrated Kayaaku POS screen will be displayed and a request to connect with mPOS device via Bluetooth will appear.
Step 3 : Customer Make Payment
The mPOS device will display the amount set from the POS application and customer can make payment on the mPOS device by:
- Tap card at the back
- Swipe card at the top
- Insert card at the side
Step 4 : Validation of Payment
Once the transaction is successful, a receipt will be displayed on merchant's Android device.
Merchant has to click on the NEXT button for the payment response to be sent back to the Kayaaku POS app.

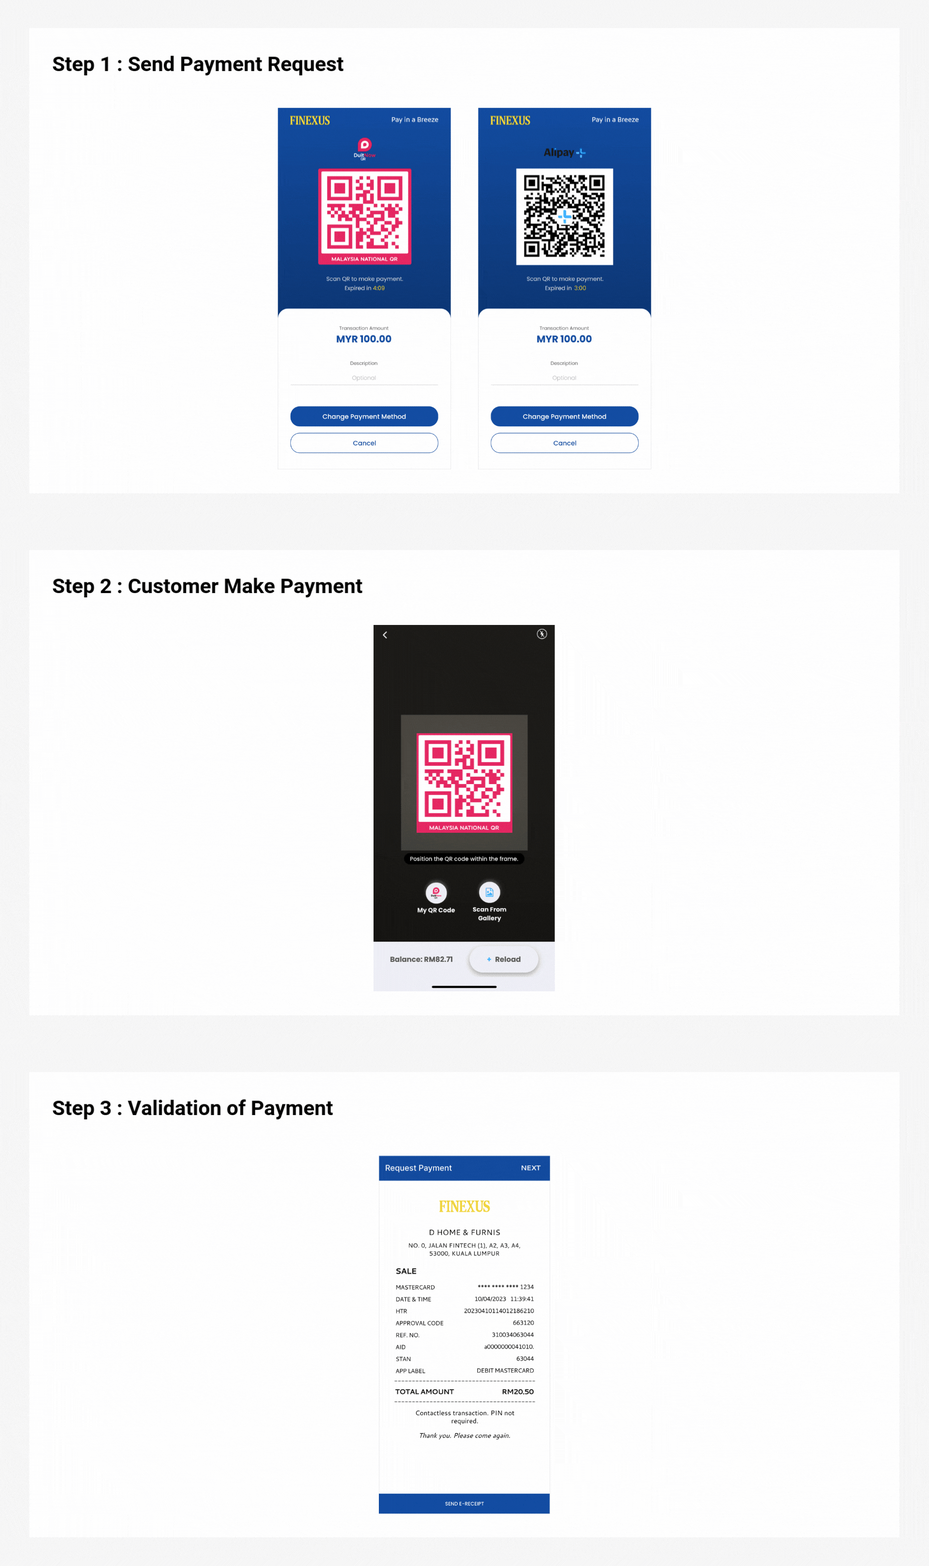
Expand for Detailed mPOS QR Payment Process
For QR code payment, the mPOS device will not be directly used.
Step 1 : Send Payment Request
Send a payment request from merchant's POS application to the Kayaaku POS. A QR code will be generated by the Kayaaku POS app and displayed on merchant's Android device.
Step 2 : Customer Make Payment
Customer scans the QR code displayed and proceeds with payment.
Step 3 : Validation of Payment
Once the transaction is successful, a receipt will be displayed on merchant's Android device.
Merchant has to click on the NEXT button for the payment response to be sent back to the Kayaaku POS app.
Kayaaku POS via USB
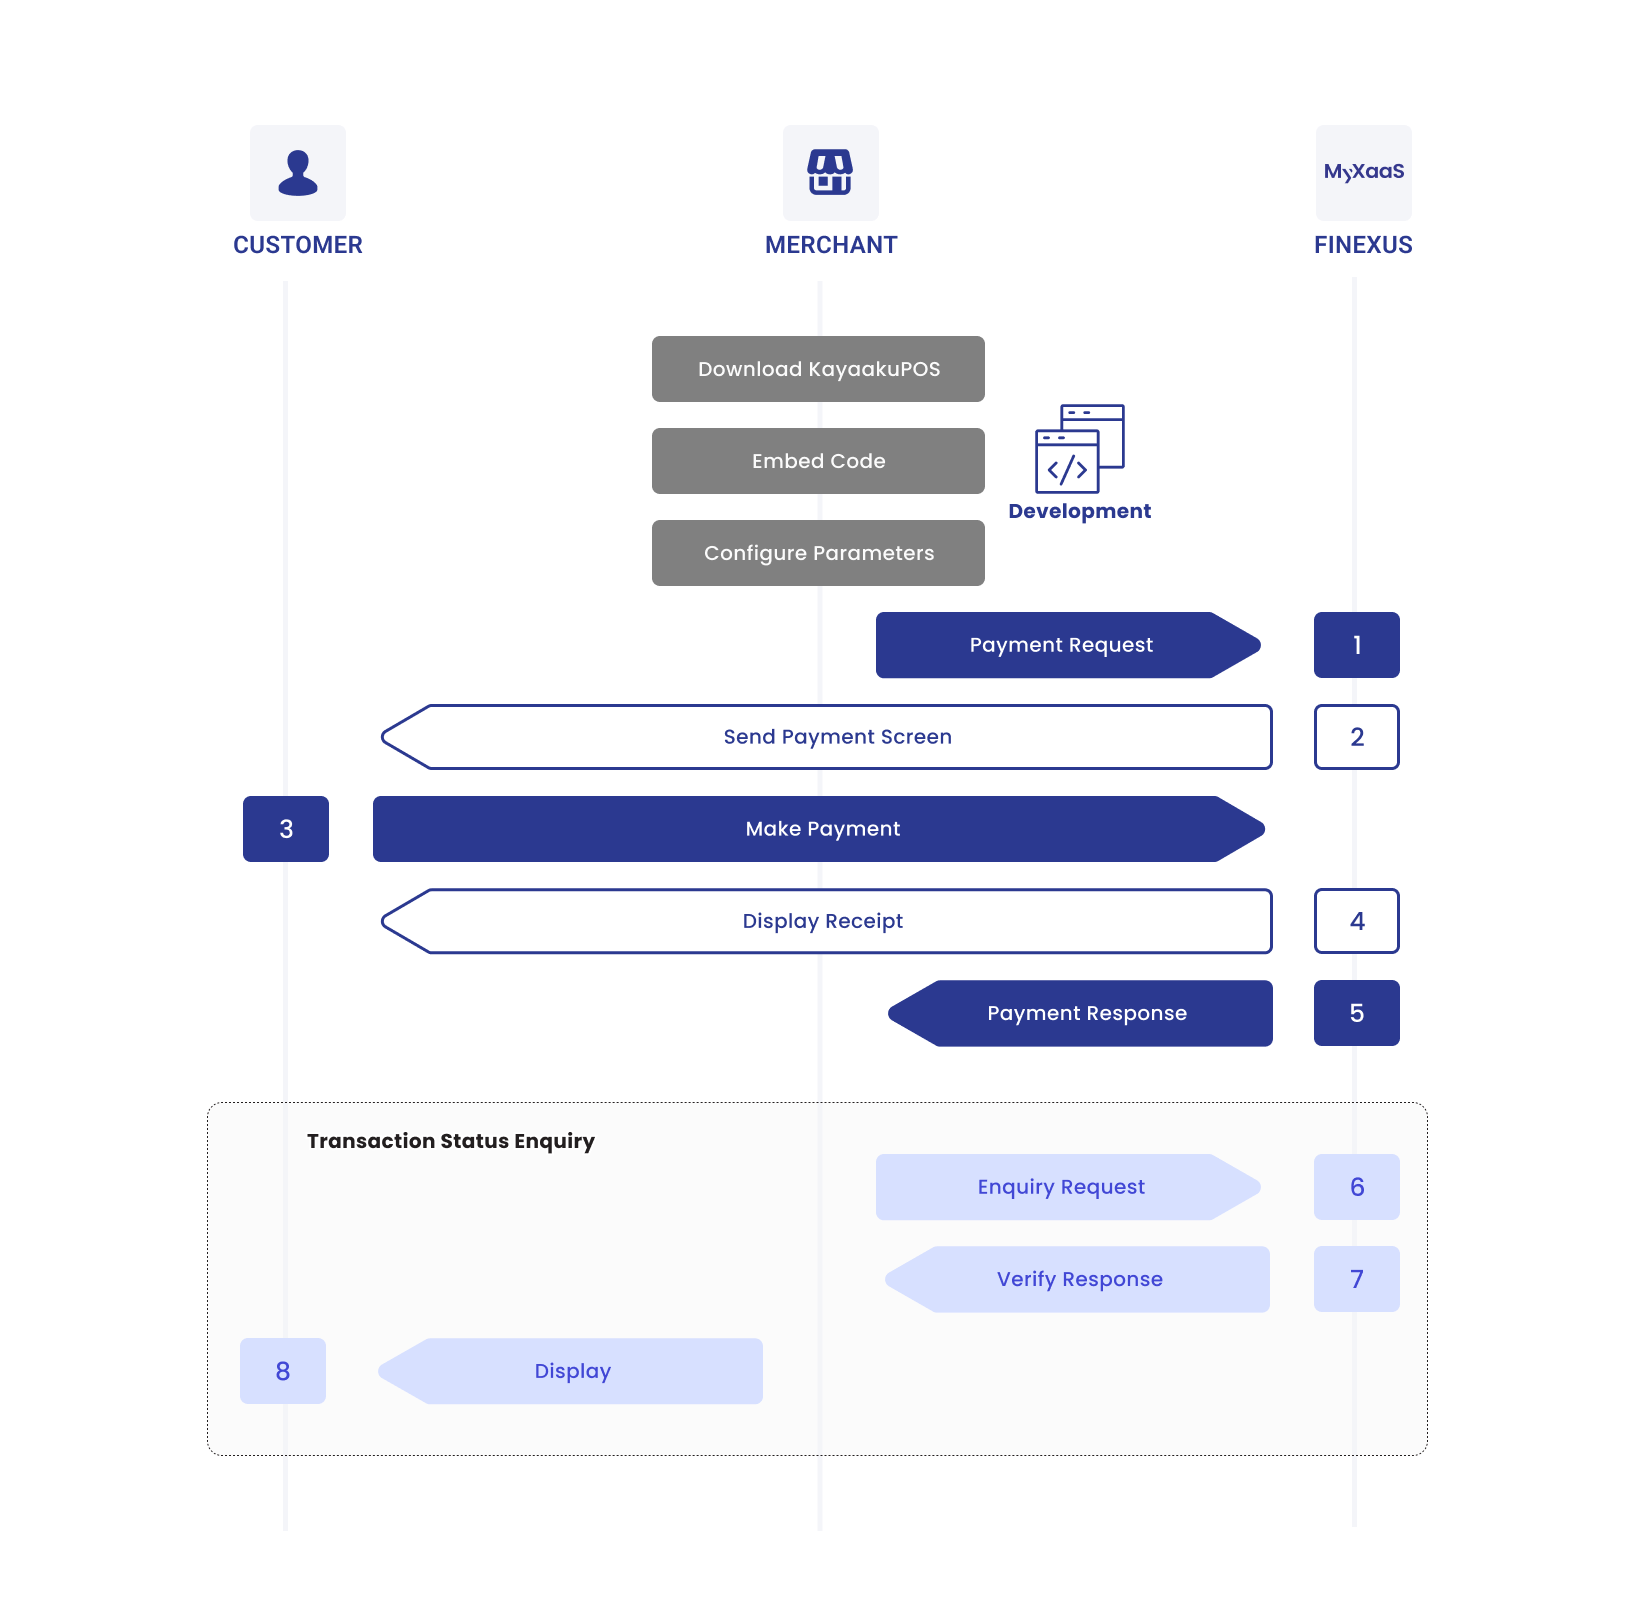
Process Flow Diagram
The diagram below provides a more detailed visual of the Kayaaku POS via USB process, mapping out each step:
Process Flow Table
The table below breaks down the Kayaaku POS via USB process into detailed steps, showing the specific interactions between the Customer, Merchant and MyXaaS:
| Step | Sender | Receiver | Process |
|---|---|---|---|
| 1 | Merchant | MyXaaS | Merchant sends payment request to MyXaaS. |
| 2 | MyXaaS | Customer | MyXaaS presents payment screen. |
| 3 | Customer | MyXaaS | Customer makes payment. |
| 4 | MyXaaS | Customer | If the payment is processed successfully, MyXaaS displays payment receipt. |
| 5 | MyXaaS | Merchant | MyXaaS sends payment response to Merchant. |
| 6 | Merchant | MyXaaS | If the payment status is not received, Merchant proceeds to send transaction status enquiry to retrieve the transaction information. |
| 7 | MyXaaS | Merchant | MyXaaS returns the status information of the payment. |
| 8 | Merchant | Customer | Merchant displays the status information to the customer. |
