UPP Payment
Streamlining Transactions: The Power of a Unified Payments Platform (UPP)
In the rapidly evolving world of digital payments, businesses and consumers demand seamless, secure, and versatile solutions for processing transactions. The Unified Payments Platform (UPP) emerges as a robust solution, integrating multiple payment methods into a single, cohesive system.
The UPP serves as a comprehensive solution designed to unify various payment channels—be it credit and debit cards, digital wallets or bank transfers into one streamlined platform. By integrating with established systems like the Finexus PayMaster Merchant Plug-In (MPI), UPP enhances its capabilities, ensuring even greater security, reliability, and access to a broad range of payment options.
This integration not only simplifies financial operations for businesses but also ensures compliance with industry standards, making it an ideal choice for enterprises of all sizes looking to offer a diverse array of payment options without the complexity of managing multiple systems.
In an era where digital transactions are becoming the norm, the Unified Payments Platform, with Finexus PayMaster MPI integration, stands out as a pivotal innovation, driving the future of payments toward greater efficiency, security, and inclusivity.
Visual Overview
The following visual overview illustrates the entire UPP payment process, showcasing the sequence of interactions.
The available payment methods include Credit/Debit Cards, DuitNow QR, Alipay+, Request To Pay and Online Banking/Wallet. Any of these services can be deactivated if they are not needed.
- Credit/Debit Cards
- DuitNow QR
- Alipay+
- Request to Pay
- Online Banking / Wallet
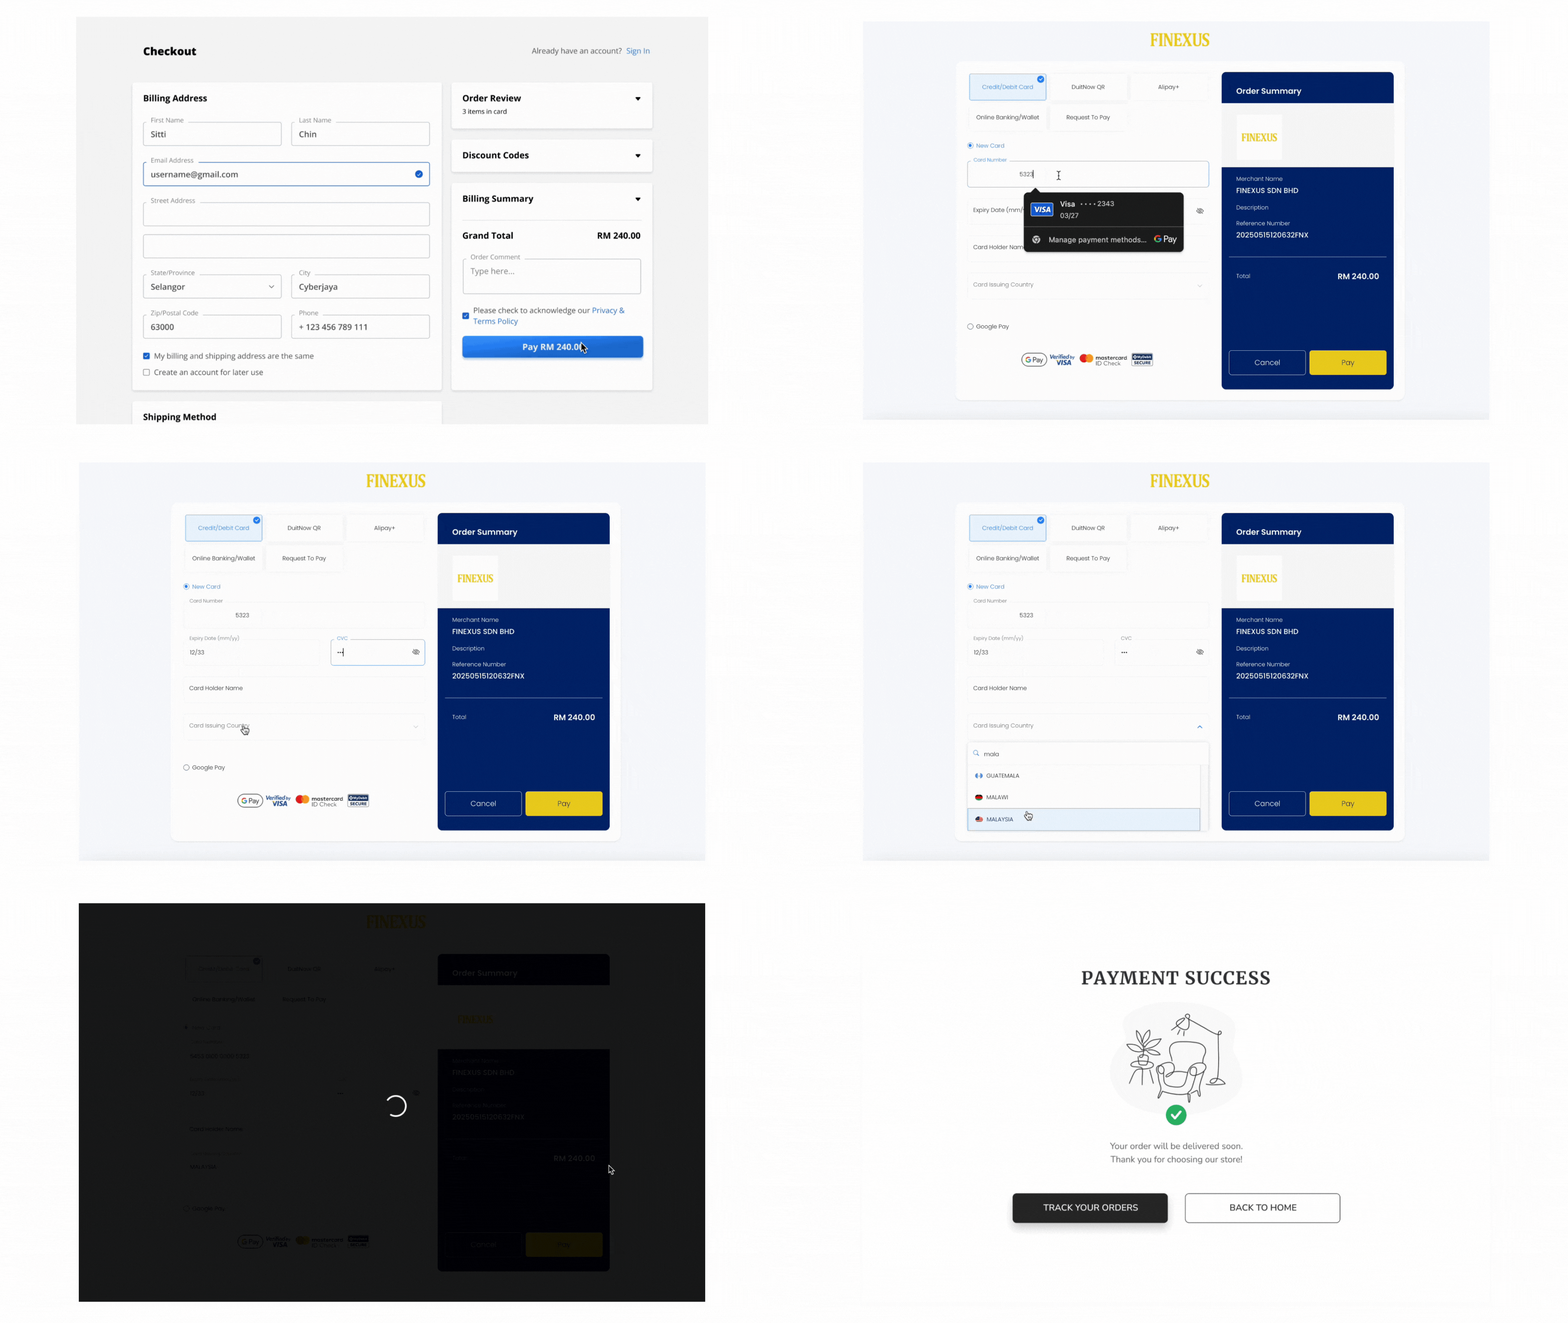
Expand for Detailed UPP Process for Credit/Debit Card Payment
Step 1 : Customer Initiates Payment
After entering checkout details on the Merchant’s site, the customer clicks "Pay," which redirects them to the PayMaster Payment Gateway page.
Step 2 : Select Payment Method
On the UPP screen, the customer selects "Credit/Debit Card" as the payment method.
Step 3 : Enter Payment Information
The customer inputs their credit/debit card information (card number, expiration date, CVV) and submits the payment request after reviewing the details.
Step 4 : Redirect to Merchant's Site
After the payment is processed, the customer will be redirected back to the Merchant’s site with a notification of the payment status.
- If the merchant does not receive the payment notification at the designated callback URL in that 30 seconds duration, it will trigger the UPP Payment Query API to check the payment status.
- If UPP Payment Response is not received, the server will repeat the query every 5 seconds for a duration of up to 30 minutes, awaiting a successful or declined status.
- If the 30-minute duration elapses without receiving a concrete status update (Approved or Failed), the merchant shall abort the purchase attempt.
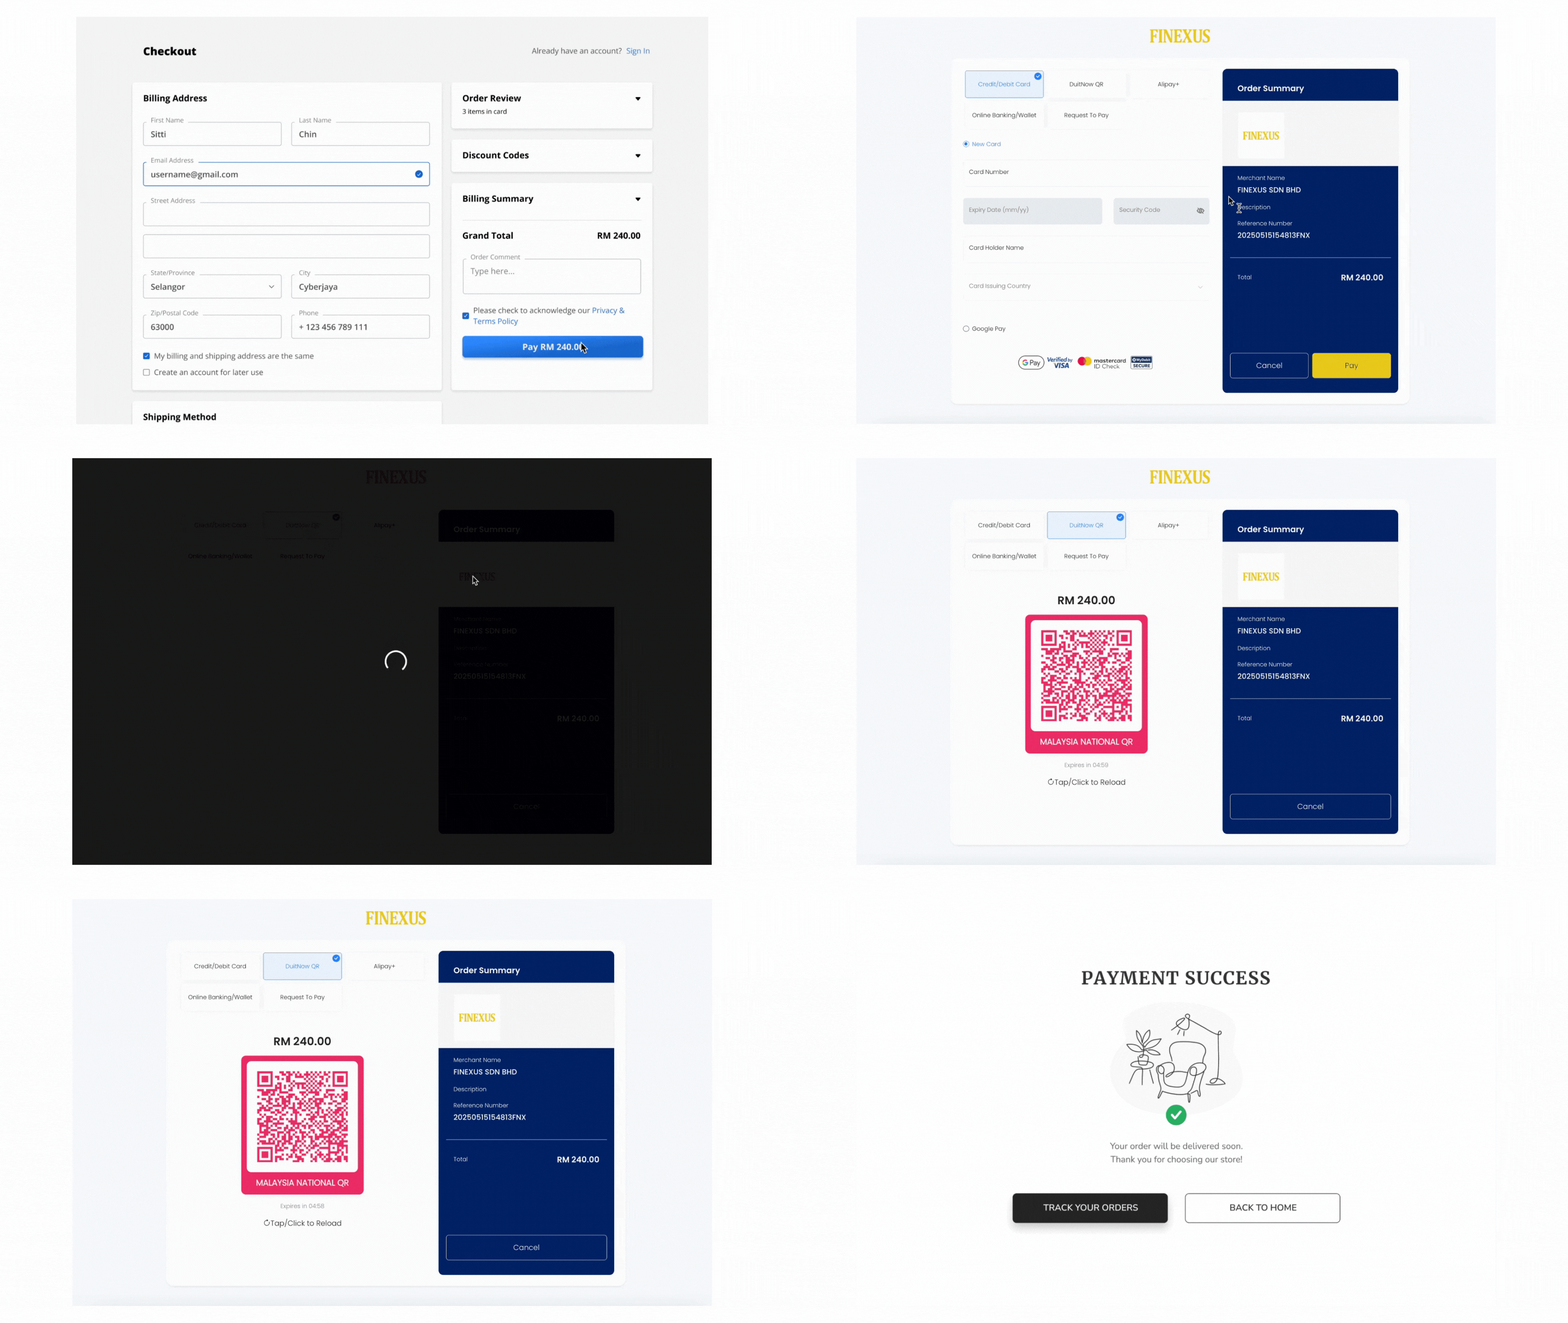
Expand for Detailed UPP Process for DuitNow QR Payment
Step 1 : Customer Initiates Payment
After entering checkout details on the Merchant’s site, the customer clicks "Pay," which redirects them to the PayMaster Payment Gateway page.
Step 2 : Select Payment Method
On the UPP screen, the customer selects "DuitNow QR" as the payment method.
Step 3 : Use E-Wallet to Scan DuitNow QR Code
The customer uses their e-wallet to scan the DuitNow QR code presented on the screen to proceed with the payment.
Step 4 : Redirect to Merchant's Site
After the payment is processed, the customer will be redirected back to the Merchant’s site with a notification of the payment status.
- If the merchant does not receive the payment notification at the designated callback URL in that 30 seconds duration, it will trigger the UPP Payment Query API to check the payment status.
- If UPP Payment Response is not received, the server will repeat the query every 5 seconds for a duration of up to 30 minutes, awaiting a successful or declined status.
- If the 30-minute duration elapses without receiving a concrete status update (Approved or Failed), the merchant shall abort the purchase attempt.
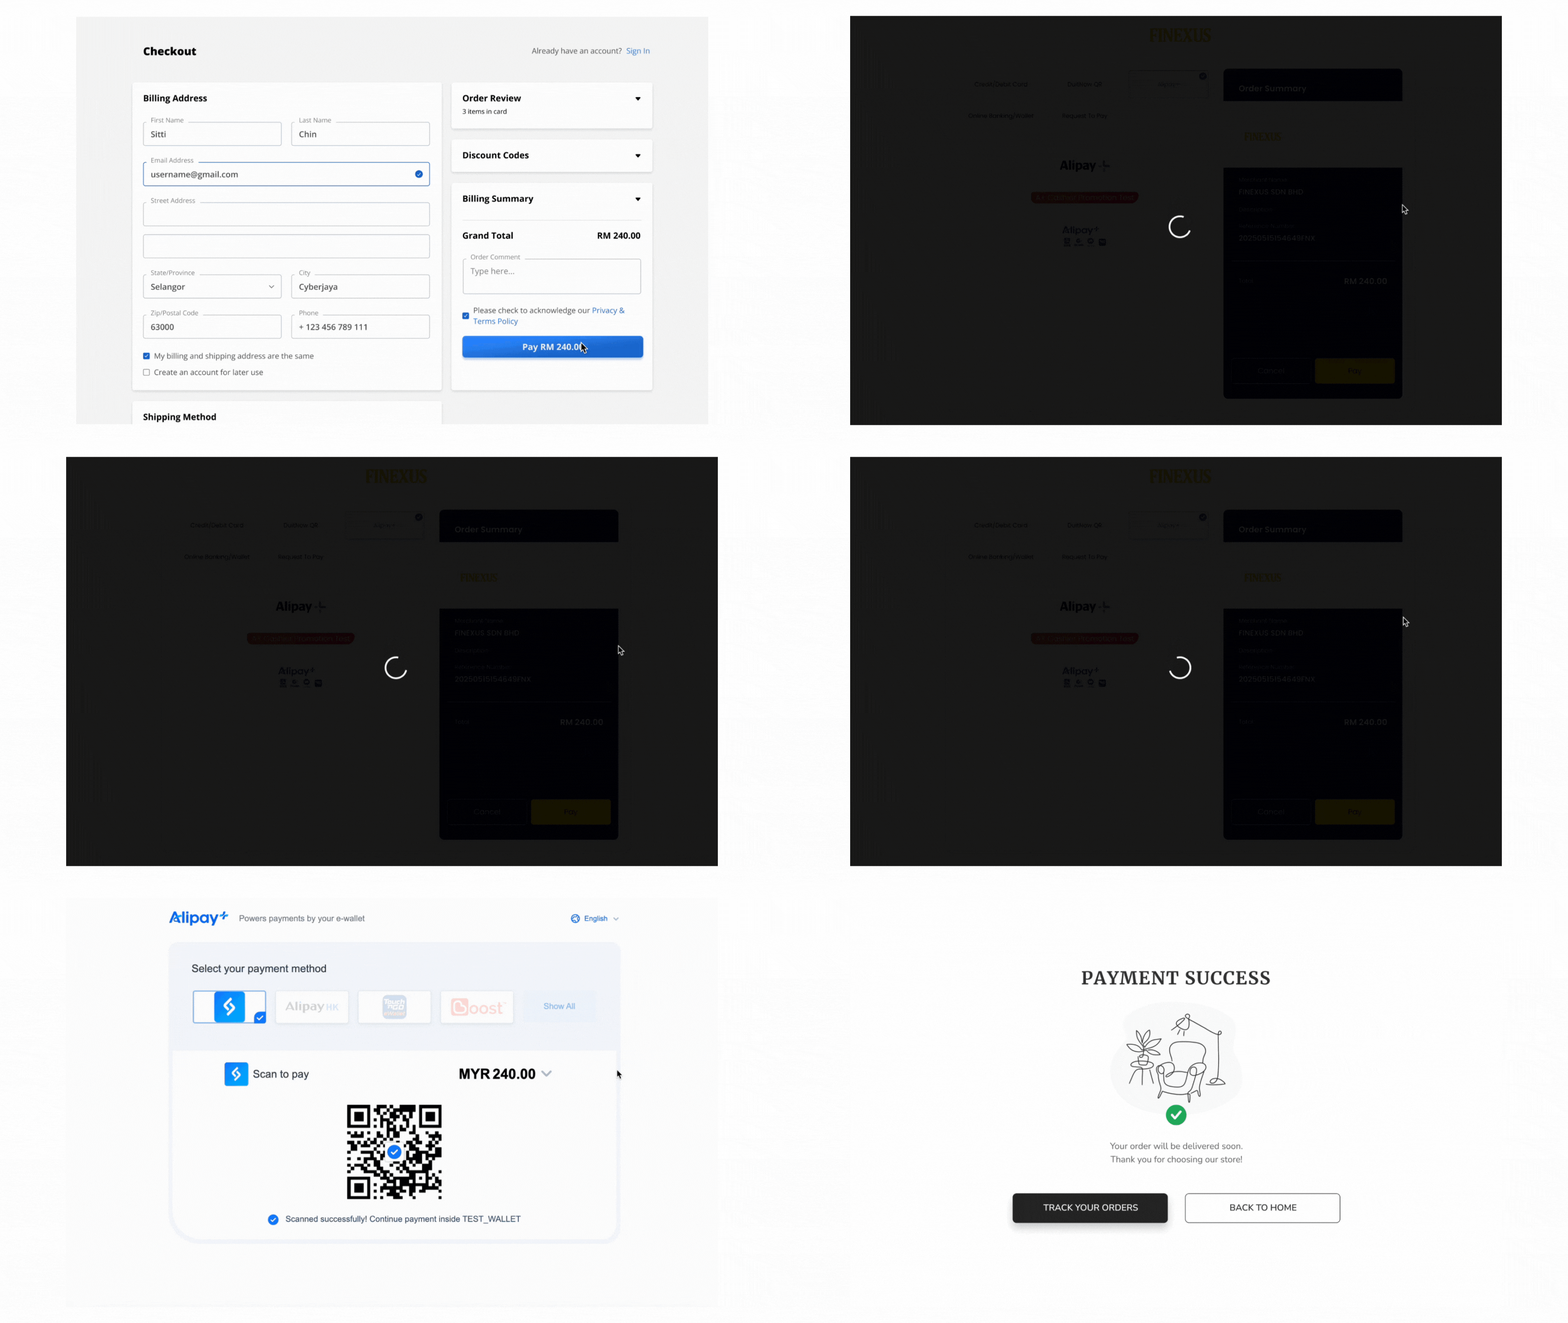
Expand for Detailed UPP Process for Alipay+ Payment
Step 1 : Customer Initiates Payment
After entering checkout details on the Merchant’s site, the customer clicks "Pay," which redirects them to the PayMaster Payment Gateway page.
Step 2 : Select Payment Method
On the UPP screen, the customer selects "Alipay+" as the payment method.
Step 3 : Use E-Wallet to Scan Alipay+ QR Code
The customer uses their e-wallet to scan the Alipay+ QR code presented on the screen to proceed with the payment.
Step 4 : Redirect to Merchant's Site
After the payment is processed, the customer will be redirected back to the Merchant’s site with a notification of the payment status.
- If the merchant does not receive the payment notification at the designated callback URL in that 30 seconds duration, it will trigger the UPP Payment Query API to check the payment status.
- If UPP Payment Response is not received, the server will repeat the query every 5 seconds for a duration of up to 30 minutes, awaiting a successful or declined status.
- If the 30-minute duration elapses without receiving a concrete status update (Approved or Failed), the merchant shall abort the purchase attempt.
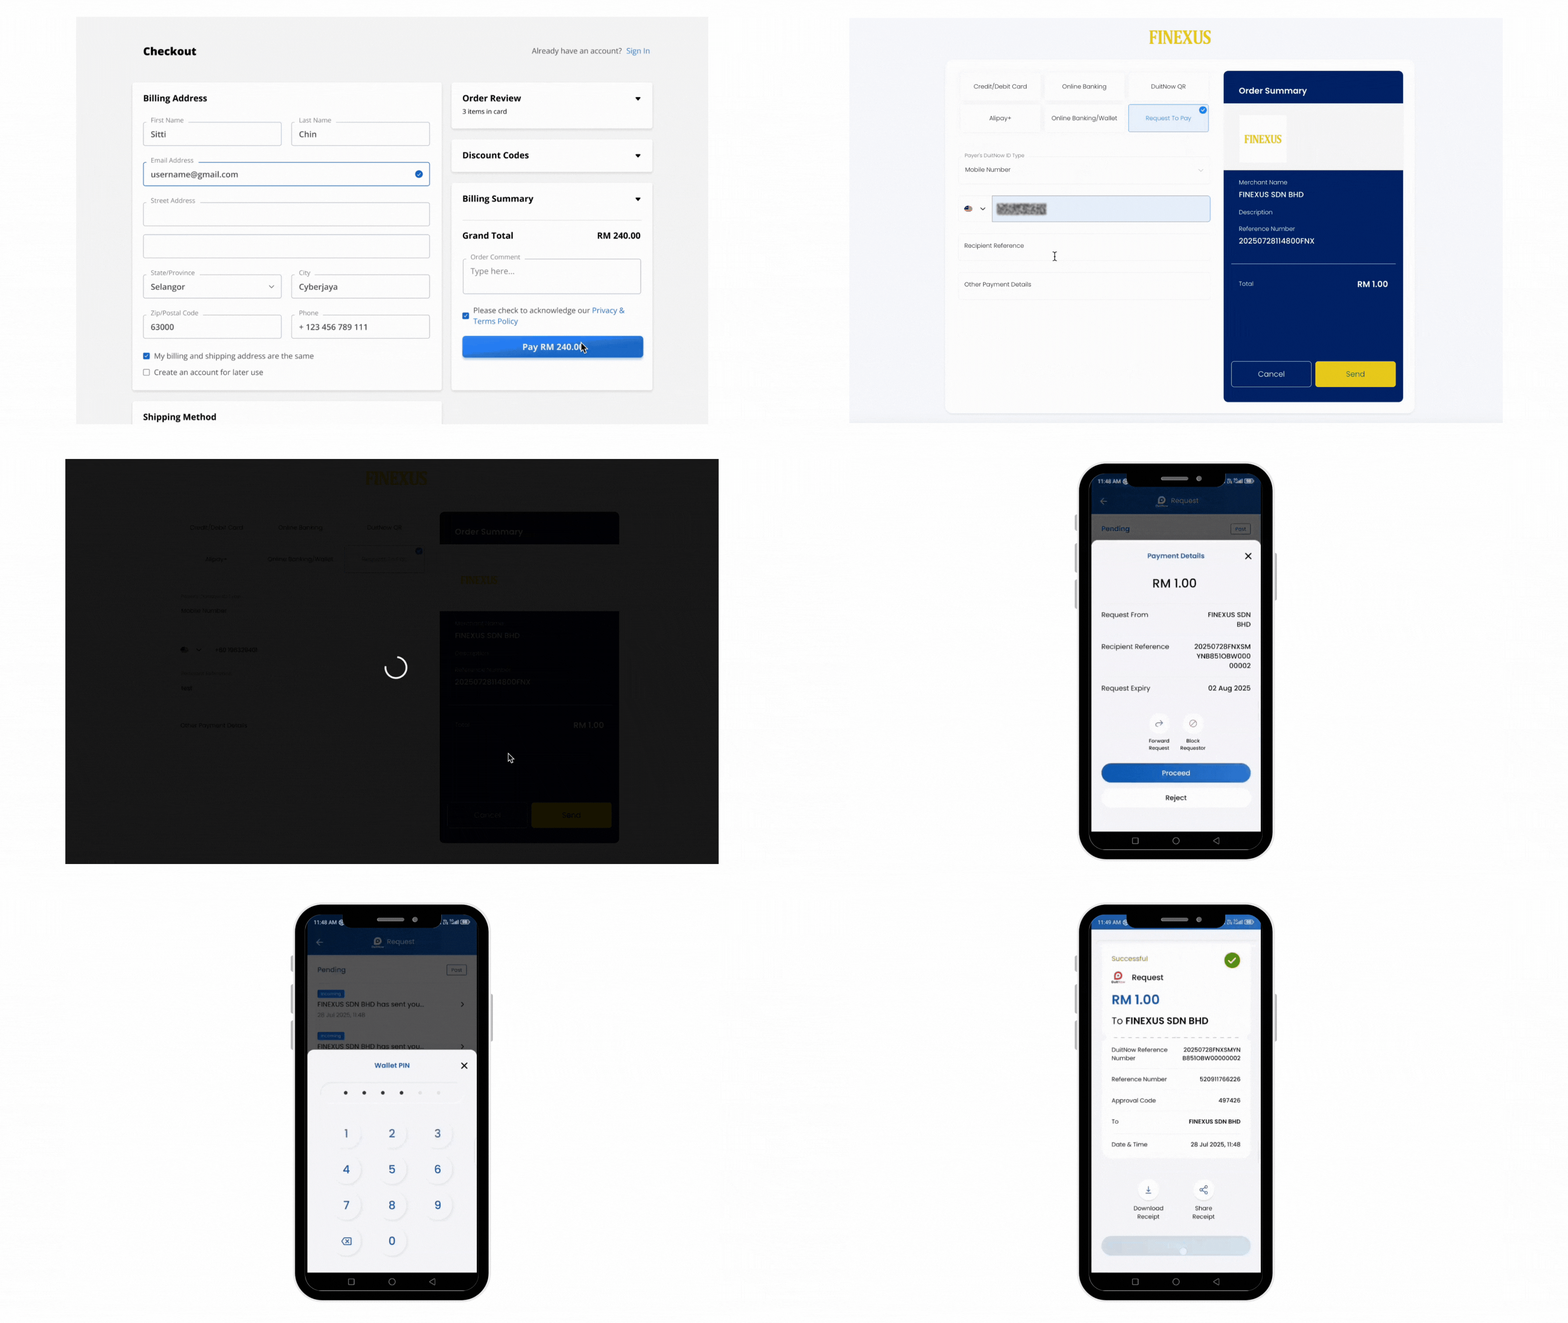
Expand for Detailed UPP Process for Request To Pay Payment
Step 1 : Customer Initiates Payment
After entering checkout details on the Merchant’s site, the customer clicks "Pay," which redirects them to the PayMaster Payment Gateway page.
Step 2 : Select Payment Method
On the UPP screen, the customer selects "Request To Pay" as the payment method.
Step 3 : Enter Payer Details
The customer enters the mobile number or DuitNow ID of the payer who will receive the payment request.
Step 4 : Payer Receives Payment Request
The payer receives a payment request notification in the banking app or e-wallet, reviews the transaction details, and approves the payment using the preferred authentication method (e.g., PIN, biometric verification).
Step 5 : Redirect to Merchant's Site
After the payment is processed, the customer will be redirected back to the Merchant’s site with a notification of the payment status.
- If the merchant does not receive the payment notification at the designated callback URL in that 30 seconds duration, it will trigger the UPP Payment Query API to check the payment status.
- If UPP Payment Response is not received, the server will repeat the query every 5 seconds for a duration of up to 30 minutes, awaiting a successful or declined status.
- If the 30-minute duration elapses without receiving a concrete status update (Approved or Failed), the merchant shall abort the purchase attempt.
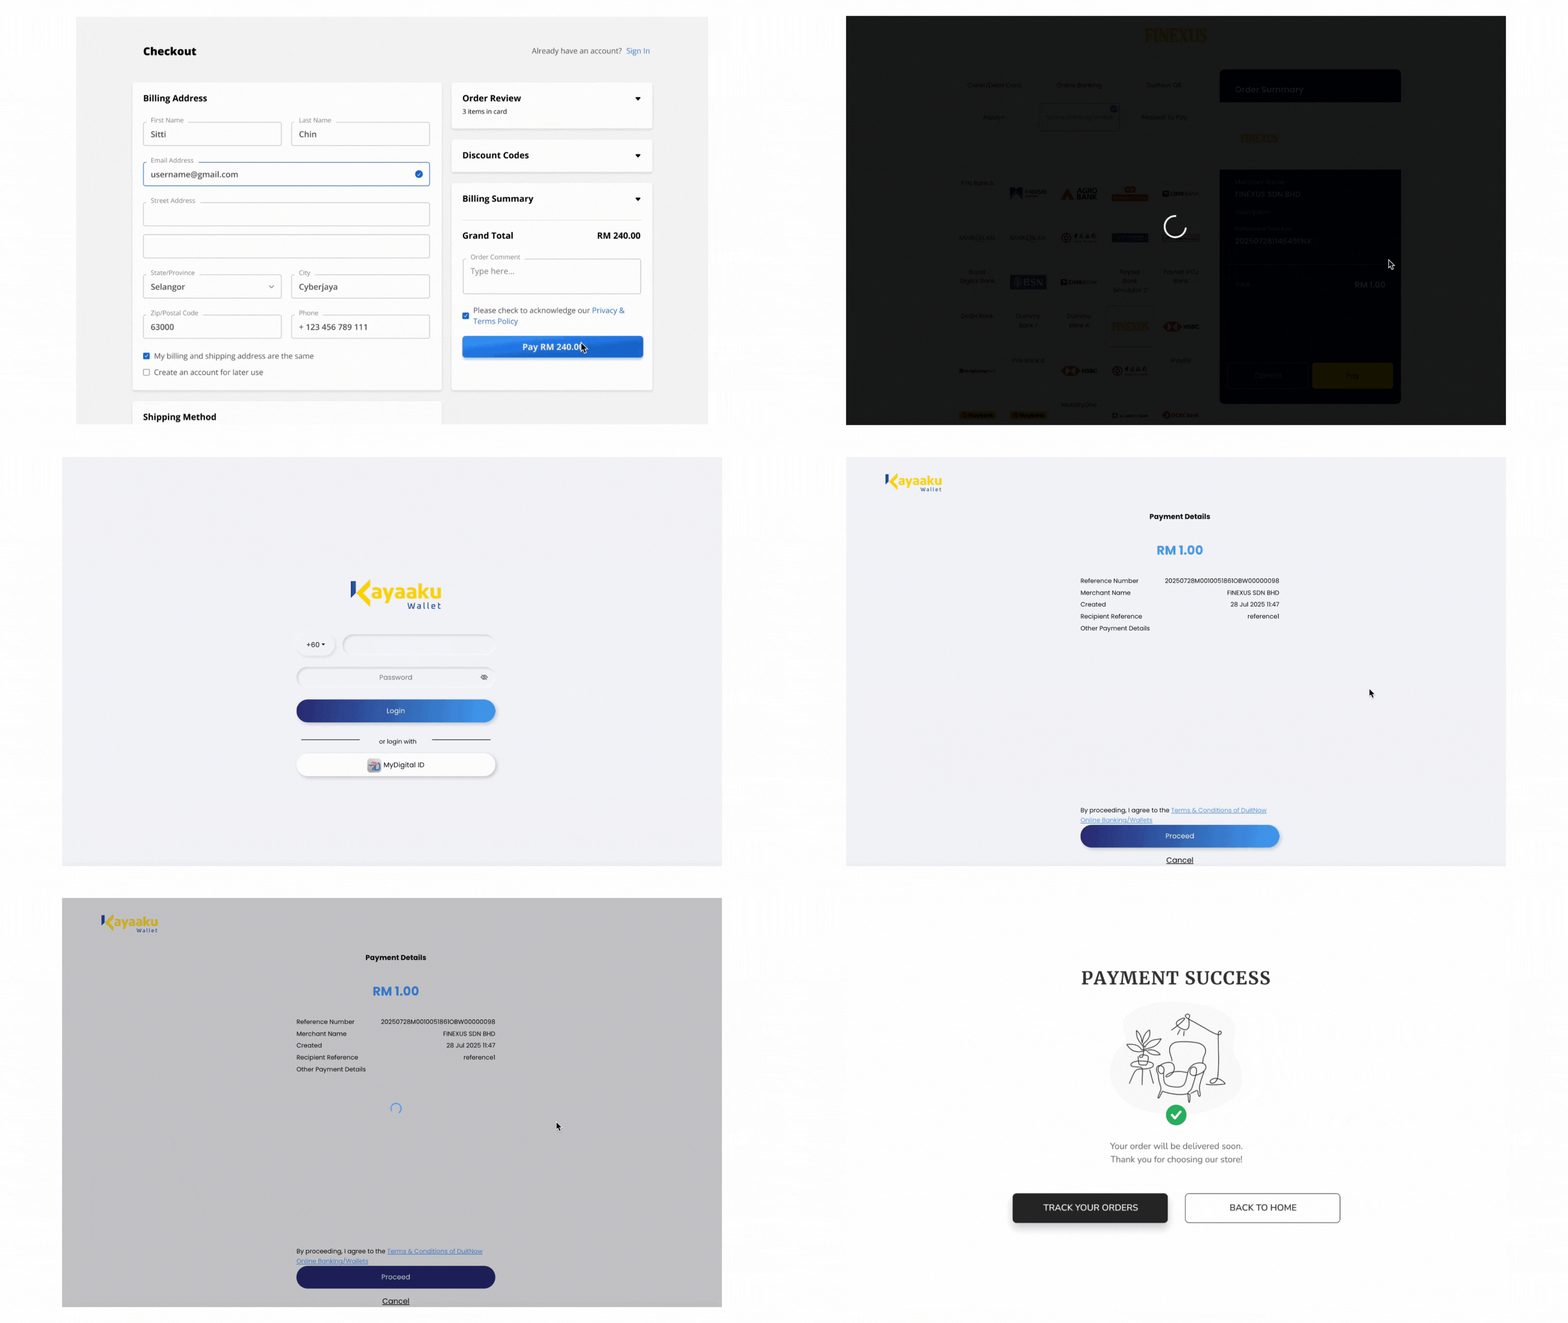
Expand for Detailed UPP Process for Online Banking / Wallet Payment
Step 1 : Customer Initiates Payment
After entering checkout details on the Merchant’s site, the customer clicks "Pay," which redirects them to the PayMaster Payment Gateway page.
Step 2 : Select Payment Method
On the UPP screen, the customer selects "Online Banking/Wallet" as the payment method.
Step 3 : Complete Payment via Selected Bank or e-Wallet
The customer either:
- Logs in to their online banking account to authorize the payment, OR
- Uses their preferred e-wallet to scan the QR code displayed on the screen and confirm the payment.
Step 4 : Redirect to Merchant's Site
After the payment is processed, the customer will be redirected back to the Merchant’s site with a notification of the payment status.
- If the merchant does not receive the payment notification at the designated callback URL in that 30 seconds duration, it will trigger the UPP Payment Query API to check the payment status.
- If UPP Payment Response is not received, the server will repeat the query every 5 seconds for a duration of up to 30 minutes, awaiting a successful or declined status.
- If the 30-minute duration elapses without receiving a concrete status update (Approved or Failed), the merchant shall abort the purchase attempt.
UPP Payment
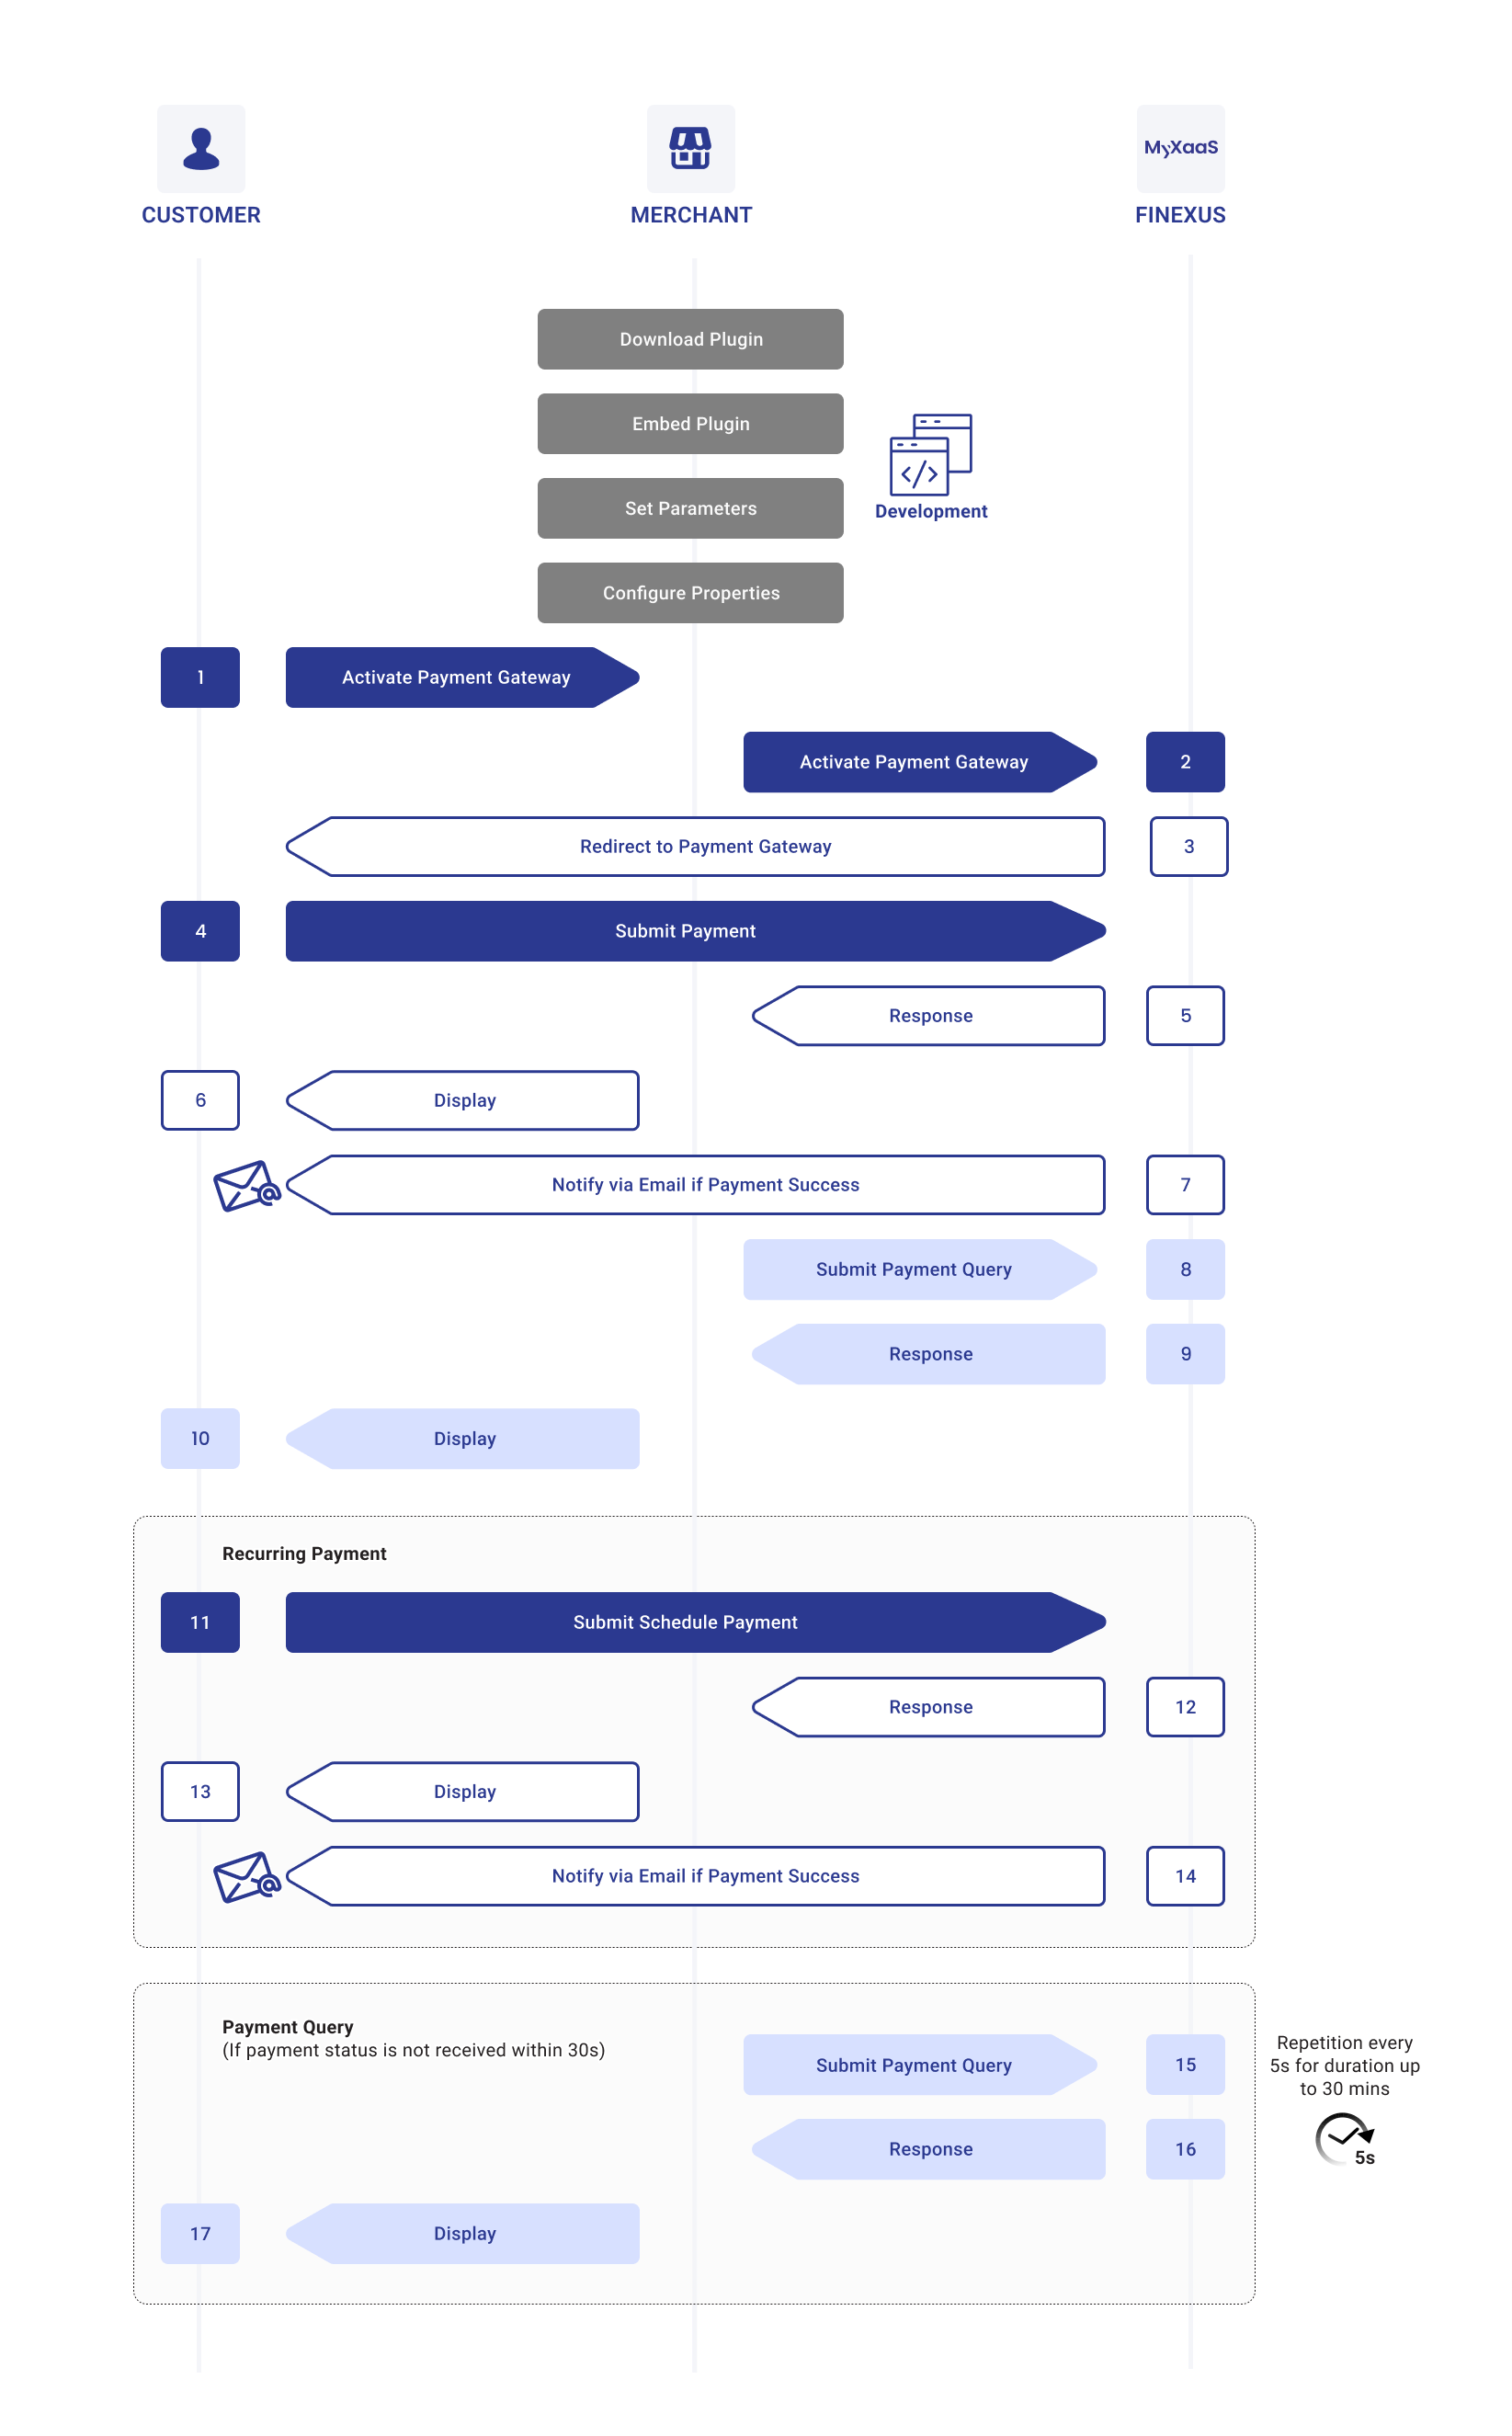
Process Flow Diagram
The diagram below provides a more detailed visual of the UPP payment process, mapping out each step:
Process Flow Table
The table below breaks down the UPP payment process into detailed steps, showing the specific interactions between the Customer, Merchant, MyXaaS, and PayMaster Payment Gateway:
| Step | Sender | Receiver | Process |
|---|---|---|---|
| 1 | Customer | Merchant | Customer initiates payment check out via Customer platform. |
| 2 | Merchant | MyXaaS | Merchant sends request to MyXaaS to activate PayMaster Payment Gateway. |
| 3 | MyXaaS | Customer | MyXaaS returns with a URL to Customer and redirects Customer to the PayMaster Payment Gateway page. |
| 4 | Customer | MyXaaS | Customer enters payment details in PayMaster Payment Gateway and proceeds for payment. |
| 5 | MyXaaS | Merchant | MyXaaS returns the payment information and status. |
| 6 | Merchant | Customer | Merchant notifies Customer on the payment status via Customer platform. |
| 7 | MyXaaS | Customer | If payment is successful, MyXaaS will notify Customer via email. |
| 8 | Merchant | MyXaaS | If payment status is not received, the Merchant can perform a payment query to retrieve the transaction information. |
| 9 | MyXaaS | Merchant | MyXaaS returns the payment query information to Merchant. |
| 10 | Merchant | Customer | Merchant displays the payment query information to the customer. |
| 11 | Customer | MyXaaS | Customer submits scheduled payment. |
| 12 | MyXaaS | Merchant | MyXaaS returns the payment information and status. |
| 13 | Merchant | Customer | Merchant notifies Customer on the payment status via Customer platform. |
| 14 | MyXaaS | Customer | If the payment is successful, MyXaaS will notify Customer via email. |
| 15 | Merchant | MyXaaS | - If the payment status is not received within 30 seconds, Merchant performs a payment query to retrieve the transaction information. - If the UPP Payment Response is not received, Merchant should repeat the query every 5 seconds for up to 30 minutes, and wait for a successful or declined status. - If no status update (Approved or Failed) is received within the 30-minute duration, Merchant shall abort the transaction |
| 16 | MyXaaS | Merchant | MyXaaS returns the payment query information. |
| 17 | Merchant | Customer | Merchant displays the payment query information to the customer. |
Pre-Authorization Payment
Pre-authorization payment is a widely used financial process that temporarily holds a specified amount of funds on a customer's payment card to ensure the availability of funds for a future transaction.
During the pre-authorization process, the payment amount is reserved but not immediately charged. This ensures that the funds are available when the final transaction occurs, reducing the risk of payment failures or disputes. Once the service is rendered or the product is delivered, the pre-authorization can be converted into a full transaction, at which point the reserved amount is captured and debited from the customer's account.
Pre-authorization payments offer both merchants and customers increased security and peace of mind. For merchants, it minimizes the risk of unpaid transactions, while customers benefit from knowing that their payment will only be finalized once they have received the agreed-upon goods or services.
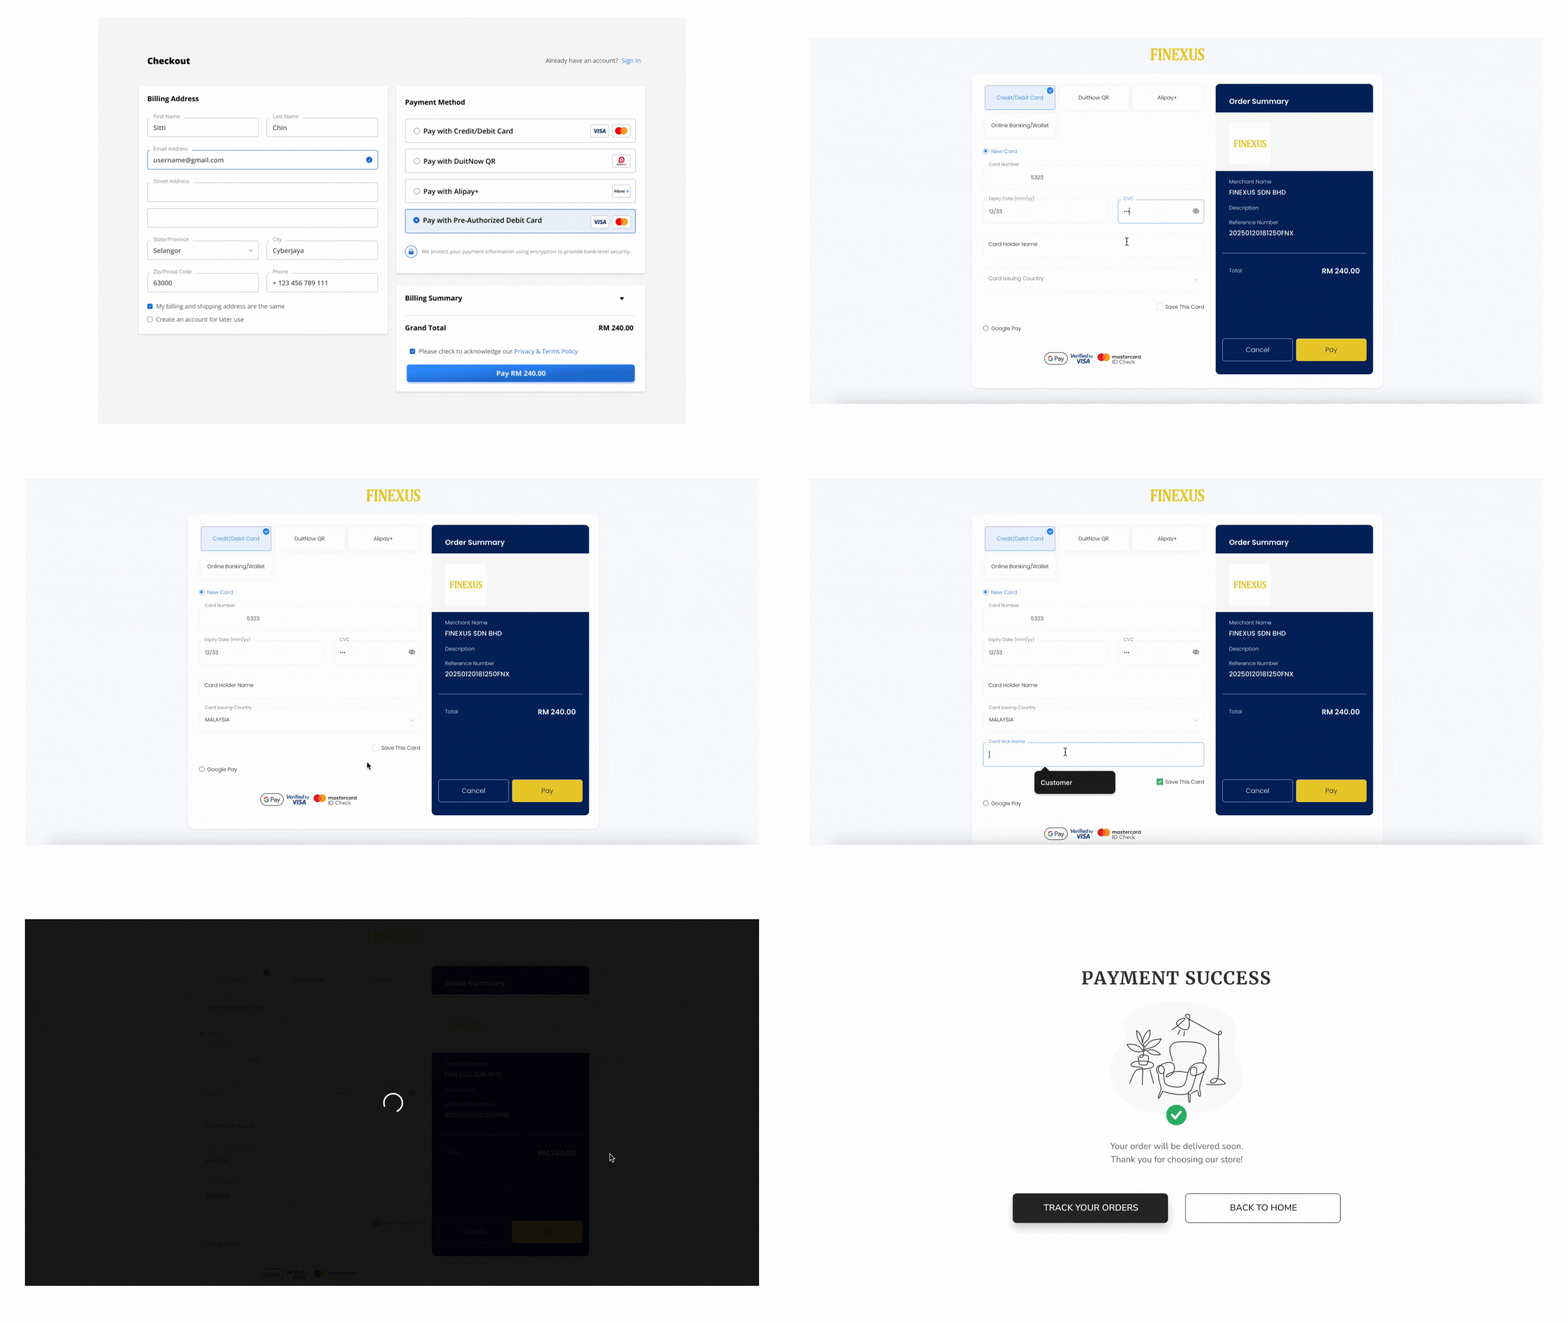
Expand for Detailed Pre-Authorization Payment
Step 1 : Customer Initiates Payment
After entering checkout details on the Merchant’s site, the customer clicks "Pay," which redirects them to the PayMaster Payment Gateway page.
For product with pre-authorization payment option, Merchant is required to set TokenFlag = "Y" and fill in MerchUserID in the Payment Parameters. This is important to generate the Payment Gateway page with "Save This Card" function.
Setting the TokenFlg = "Y" will auto-fill the "Save This Card" function. This is important to generate a token associated to the Customer’s card.
Step 2 : Enter Payment Information
The customer inputs their credit/debit card information (card number, expiration date, CVV) and submits the payment request after reviewing the details.
Step 3 : Redirect to Merchant's Site
After the payment is processed, the customer will be redirected back to the Merchant’s site with a notification of the payment status.
- If the merchant does not receive the payment notification at the designated callback URL in that 30 seconds duration, it will trigger the UPP Payment Query API to check the payment status.
- If UPP Payment Response is not received, the server will repeat the query every 5 seconds for a duration of up to 30 minutes, awaiting a successful or declined status.
- If the 30-minute duration elapses without receiving a concrete status update (Approved or Failed), the merchant shall abort the purchase attempt.
Step 4 : Schedule Payment Request
Merchant can schedule the payment to send out the payment request when it’s due.
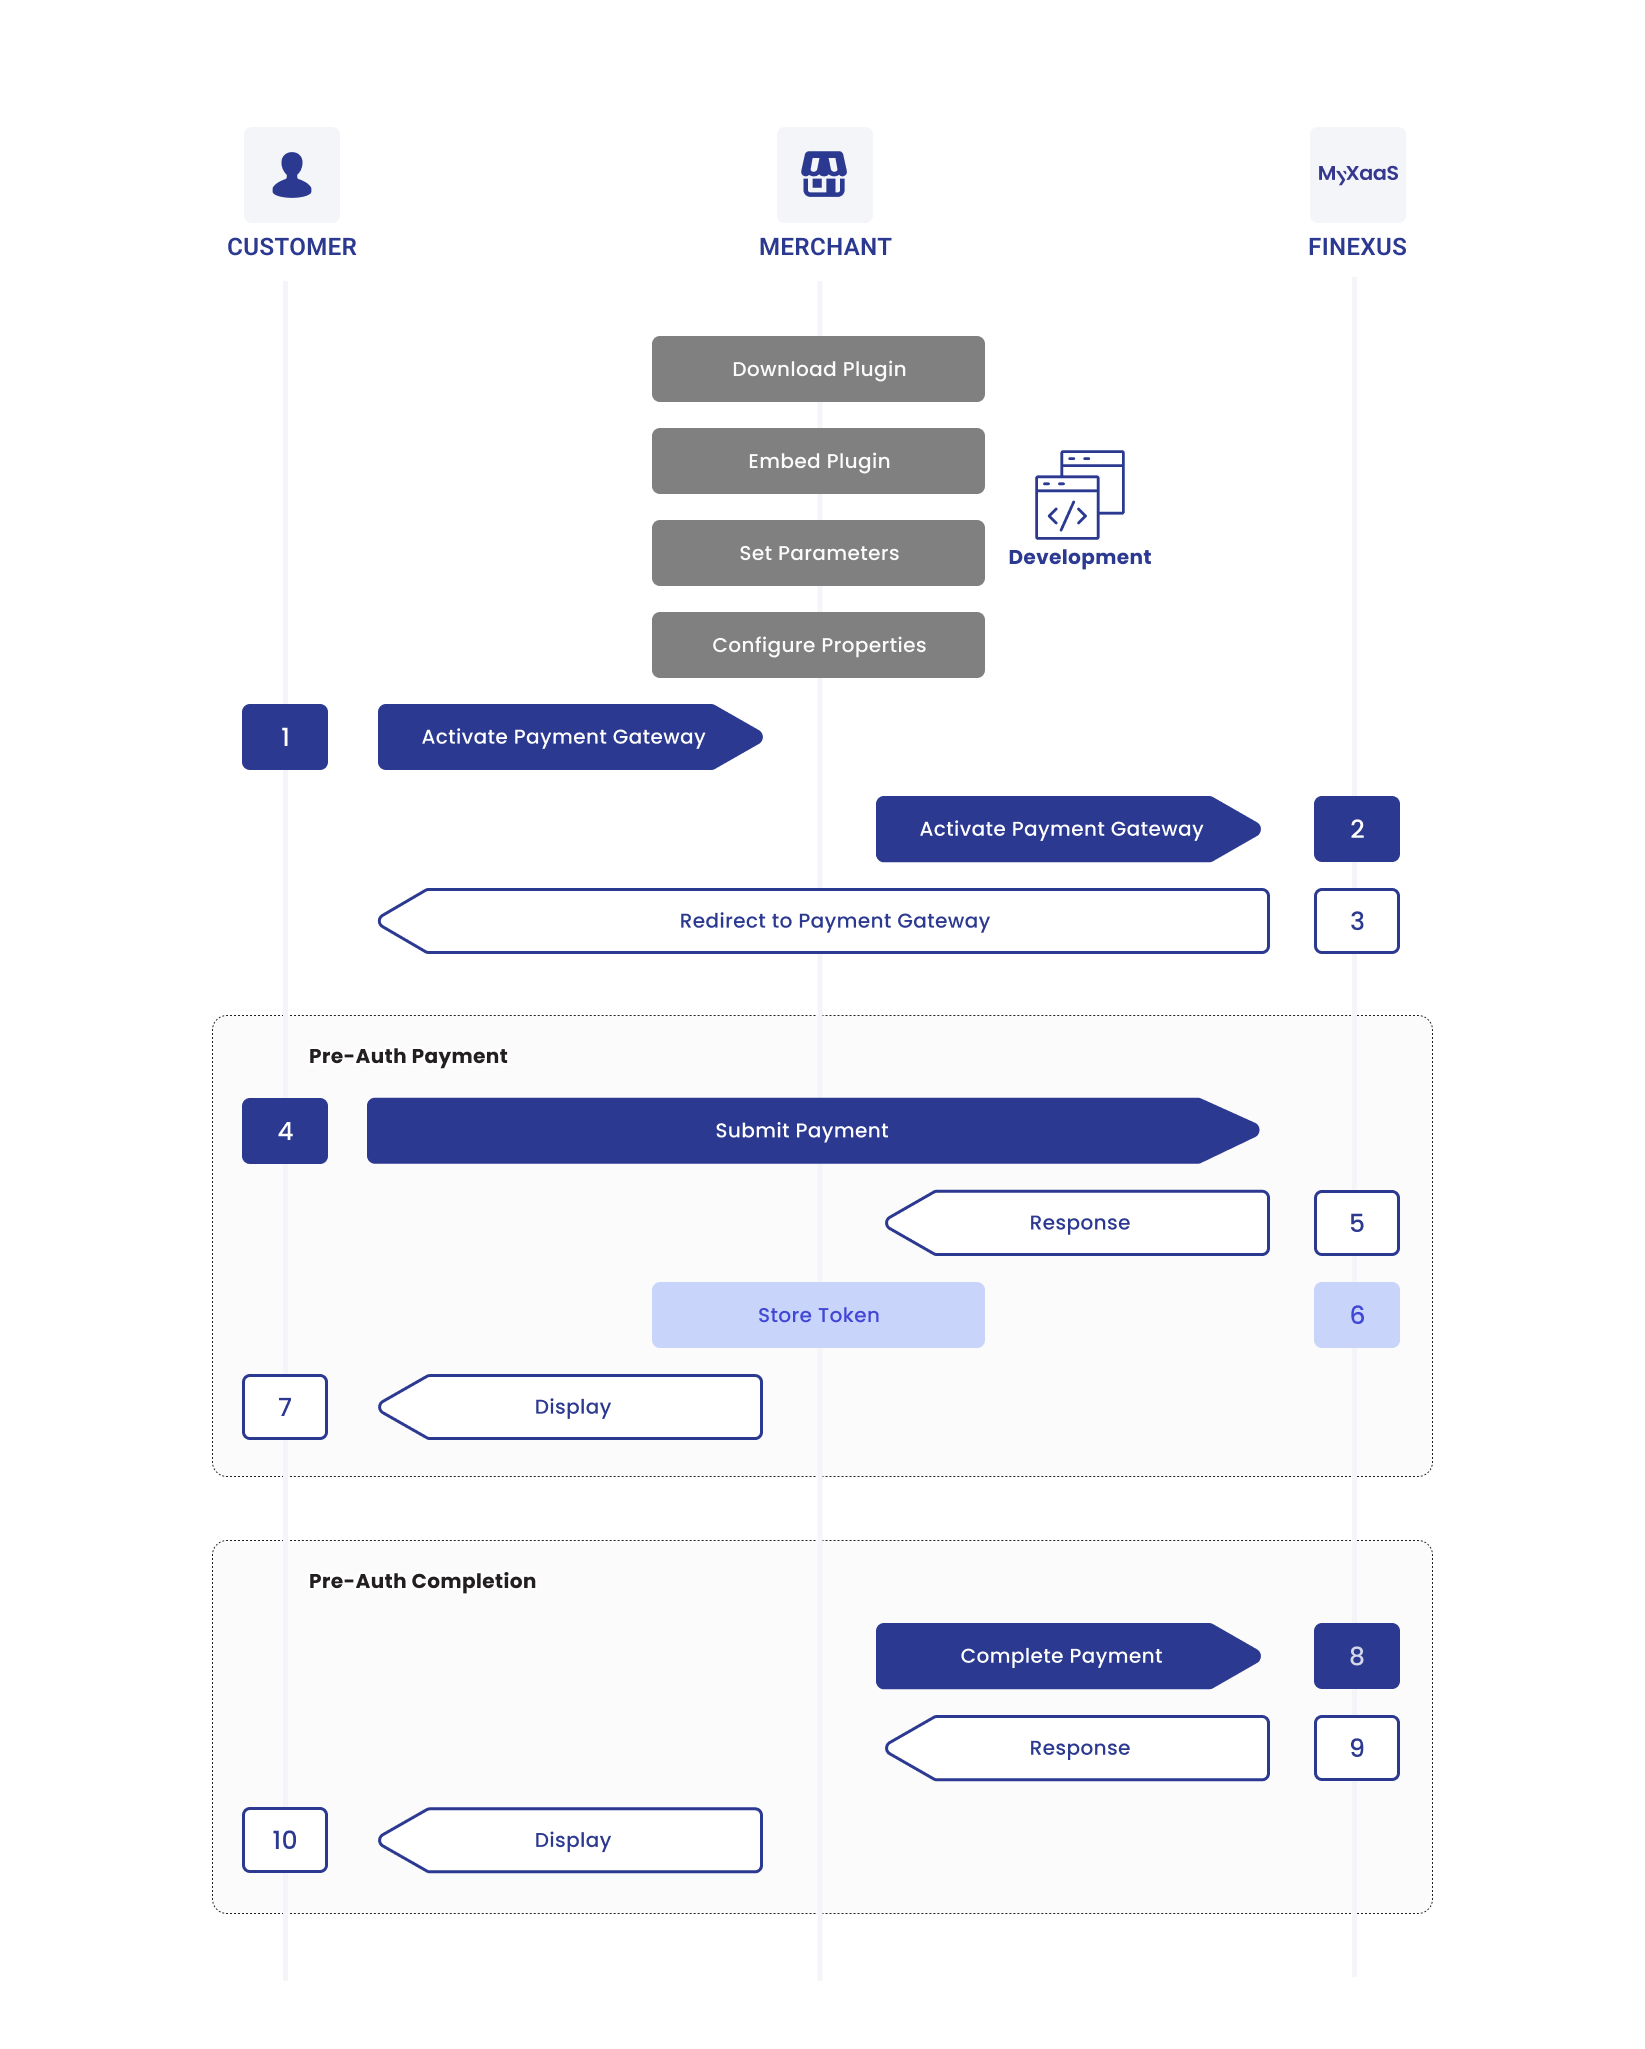
Process Flow Diagram
The diagram below provides a more detailed visual of the Pre-Authorization Payment process, mapping out each step:
Process Flow Table
The table below breaks down the Pre-Authorization Payment process into detailed steps, showing the specific interactions between the Customer, Merchant, MyXaaS, and PayMaster Payment Gateway:
| Step | Sender | Receiver | Process |
|---|---|---|---|
| 1 | Customer | Merchant | Customer initiates payment check out via Customer platform. |
| 2 | Merchant | MyXaaS | Merchant sends request to MyXaaS to activate PayMaster Payment Gateway. |
| 3 | MyXaaS | Customer | MyXaaS returns with a URL to Customer and redirects Customer to the PayMaster Payment Gateway page. |
| 4 | Customer | MyXaaS | Customer enters payment details in PayMaster Payment Gateway and proceeds for payment. |
| 5 | MyXaaS | Merchant | MyXaaS returns the payment information and status. |
| 6 | Merchant | Merchant stores the payment information for pre-authorization. | |
| 7 | Merchant | Customer | Merchant displays pre-authorized payment status to the customer. |
| 8 | Merchant | MyXaaS | Merchant sends request to complete previous payment. |
| 9 | MyXaaS | Merchant | MyXaaS returns the completed payment's information and status. |
| 10 | Merchant | Customer | Merchant displays the payment completion status to the customer. |
